There are several side activities for you to seek out in Midnight Fight Express, from trying to achieve S Rankings on every mission to tackling challenges to finding Special Characters hidden throughout a select few of the game's forty levels.
While the Special Characters won't contribute to your overall mission progression, finding all of them will net you the 'People Person' achievement and is a necessary goal to tackle if you are planning on doing everything the game offers. Furthermore, don't expect cosmetics or other rewards, as you seemingly get nothing other than the achievement for finding all of them. Still, they aren't too much of a hassle to track down, so let's get into it!
Special Character Quicklinks
| Special Character 1 | Special Character 9 | Special Character 17 | Special Character 25 |
| Special Character 2 | Special Character 10 | Special Character 18 | Special Character 26 |
| Special Character 3 | Special Character 11 | Special Character 19 | Special Character 27 |
| Special Character 4 | Special Character 12 | Special Character 20 | Special Character 28 |
| Special Character 5 | Special Character 13 | Special Character 21 | Special Character 29 |
| Special Character 6 | Special Character 14 | Special Character 22 | Special Character 30 |
| Special Character 7 | Special Character 15 | Special Character 23 | Special Character 31 |
| Special Character 8 | Special Character 16 | Special Character 24 | Special Character 32 |
Special Character #1
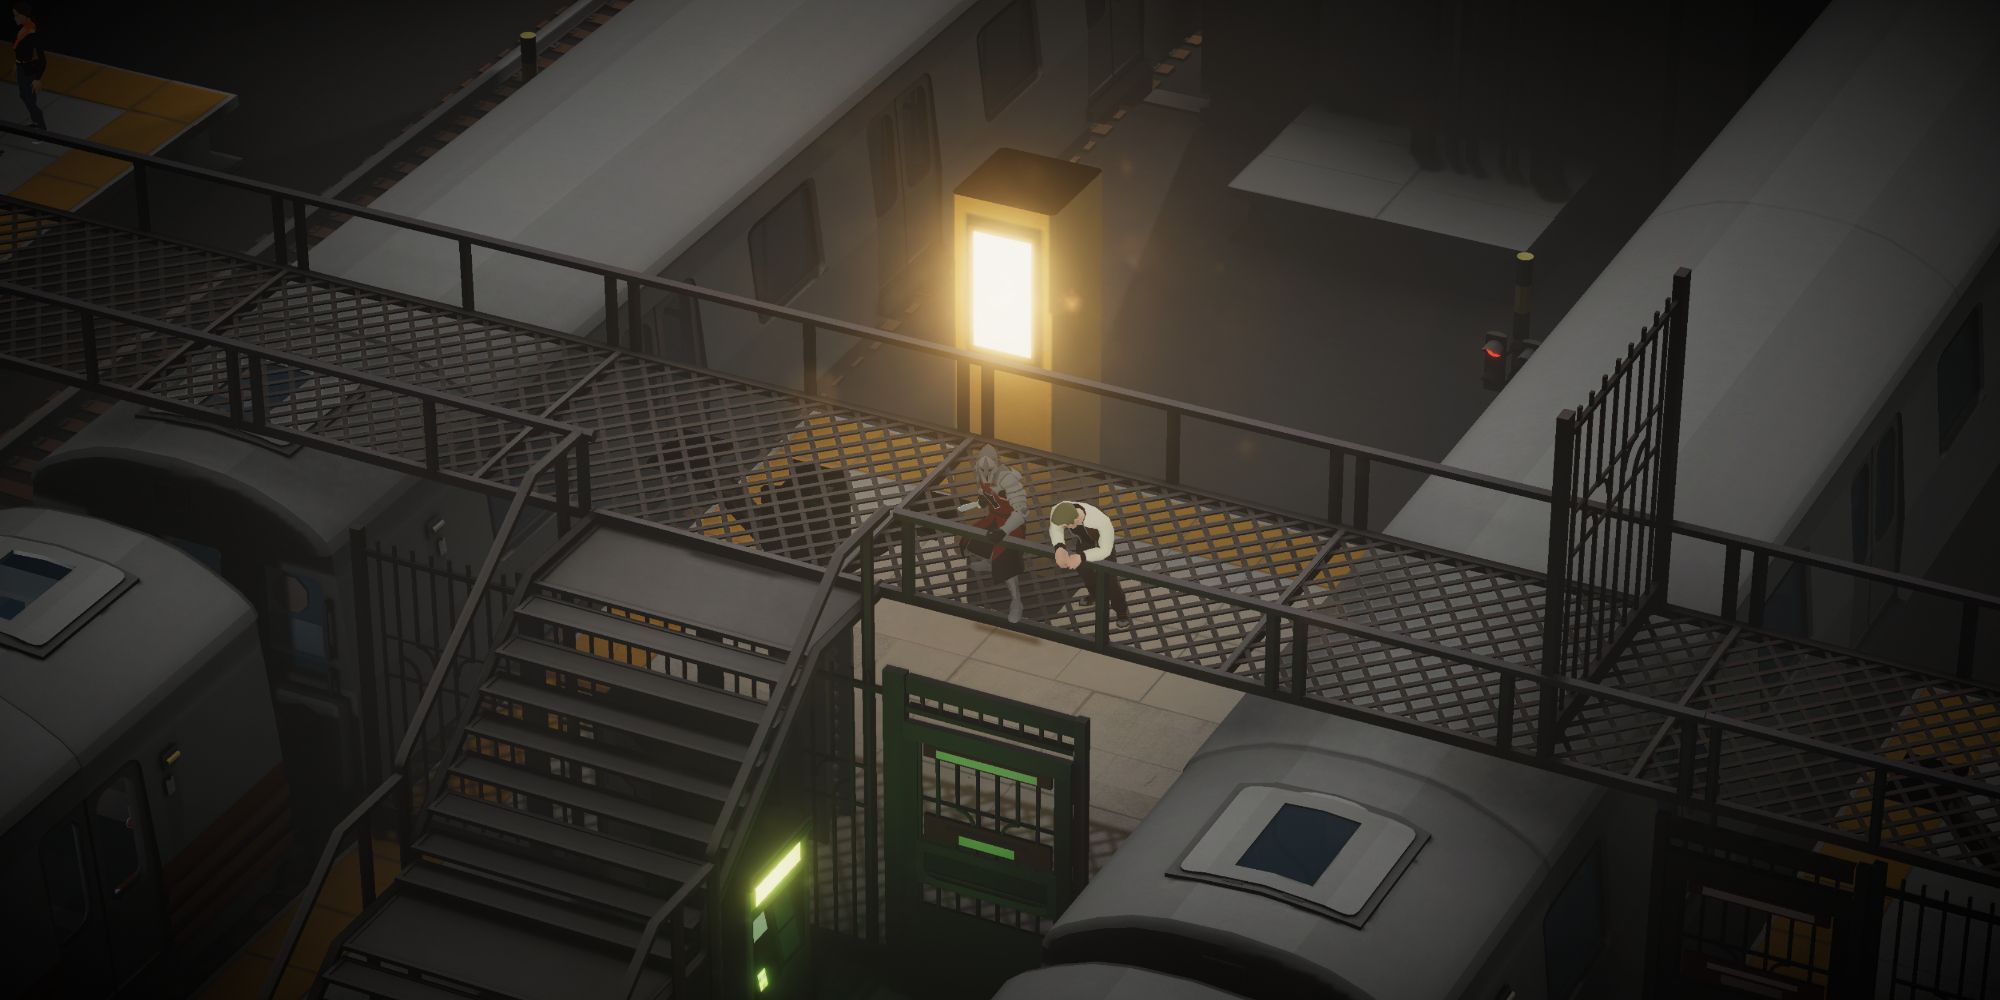
The first Special Character of Midnight Fight Express can be found in the game's fourth mission, Metro Station. Since he's the introductory one, he's pretty easy to find and is at the beginning portion of the level. To get to him, all you have to do is fight through a handful of groups until you have to take stairs up the scaffolding above the trains. Look to the right to see this Special Character leaning over the railing, looking a bit down. Press the corresponding input above his head to cross off your first Special Character!
- Mission 4 – Metro Station
Return to Special Character Quicklinks
Special Character #2
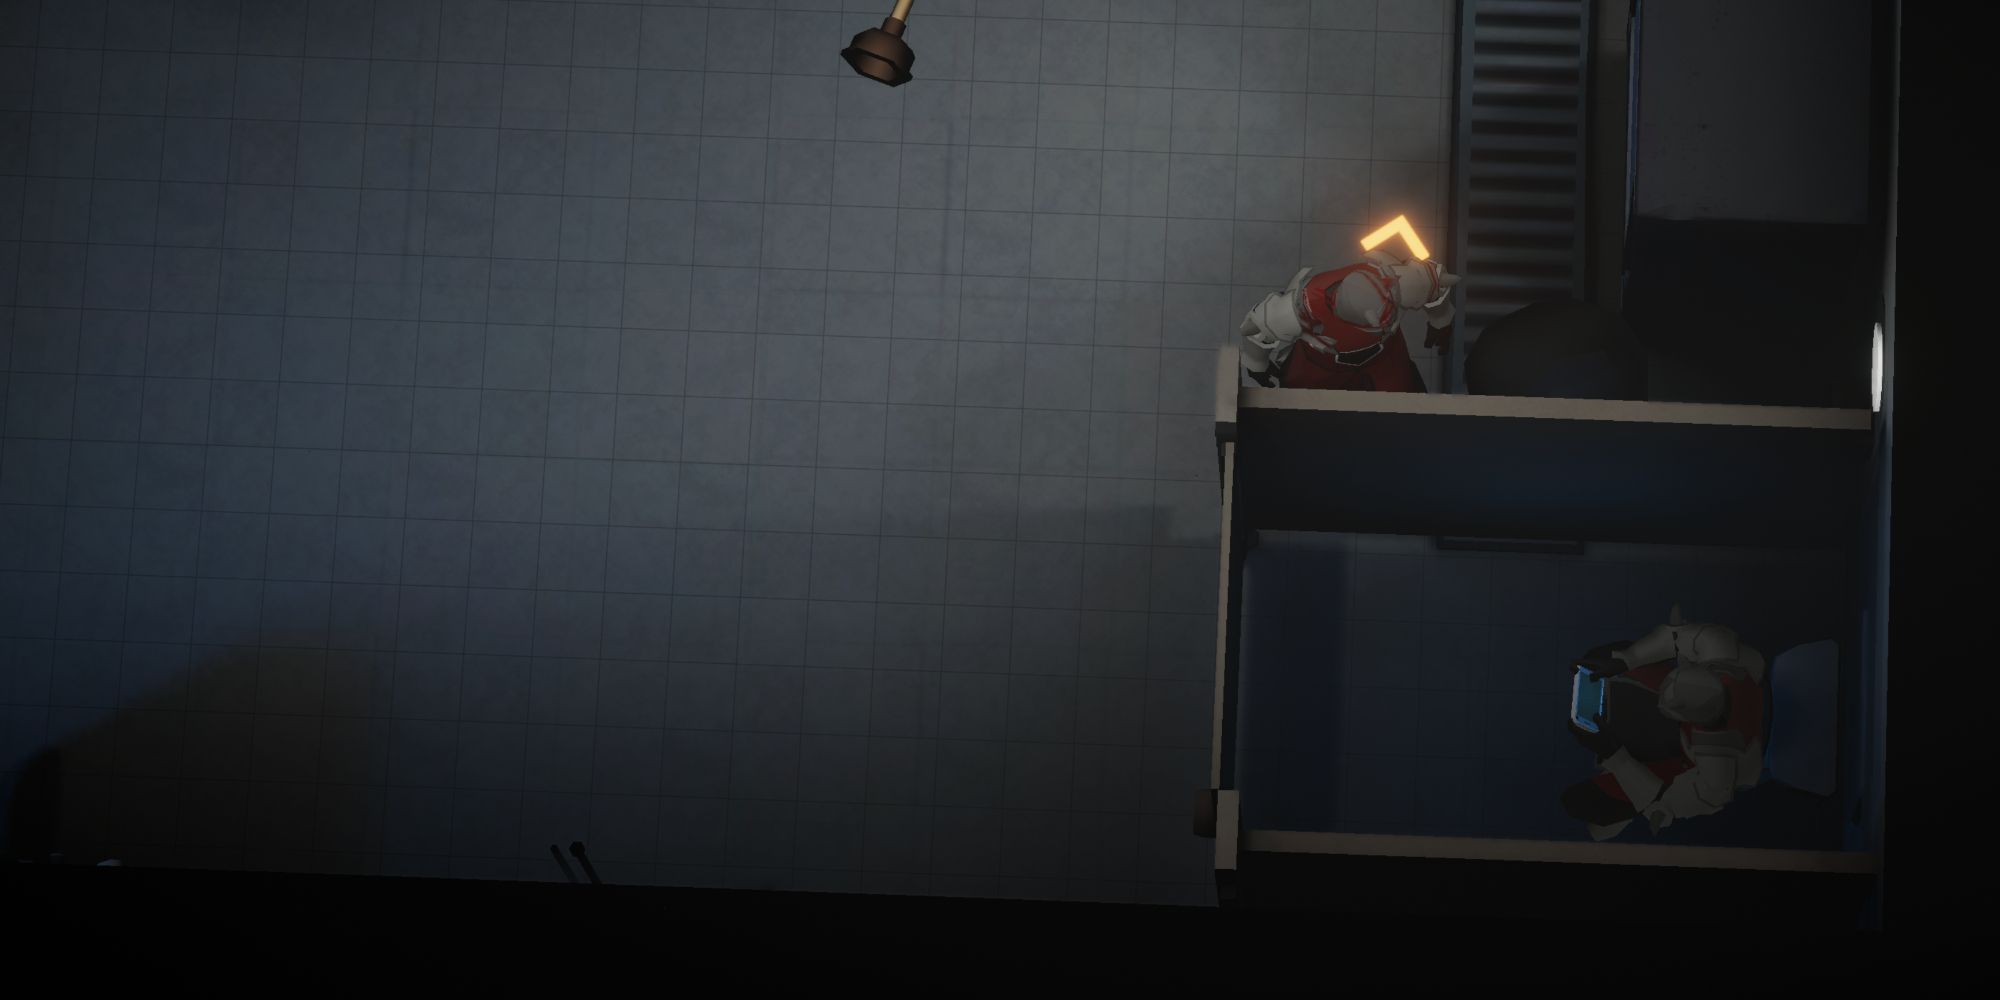
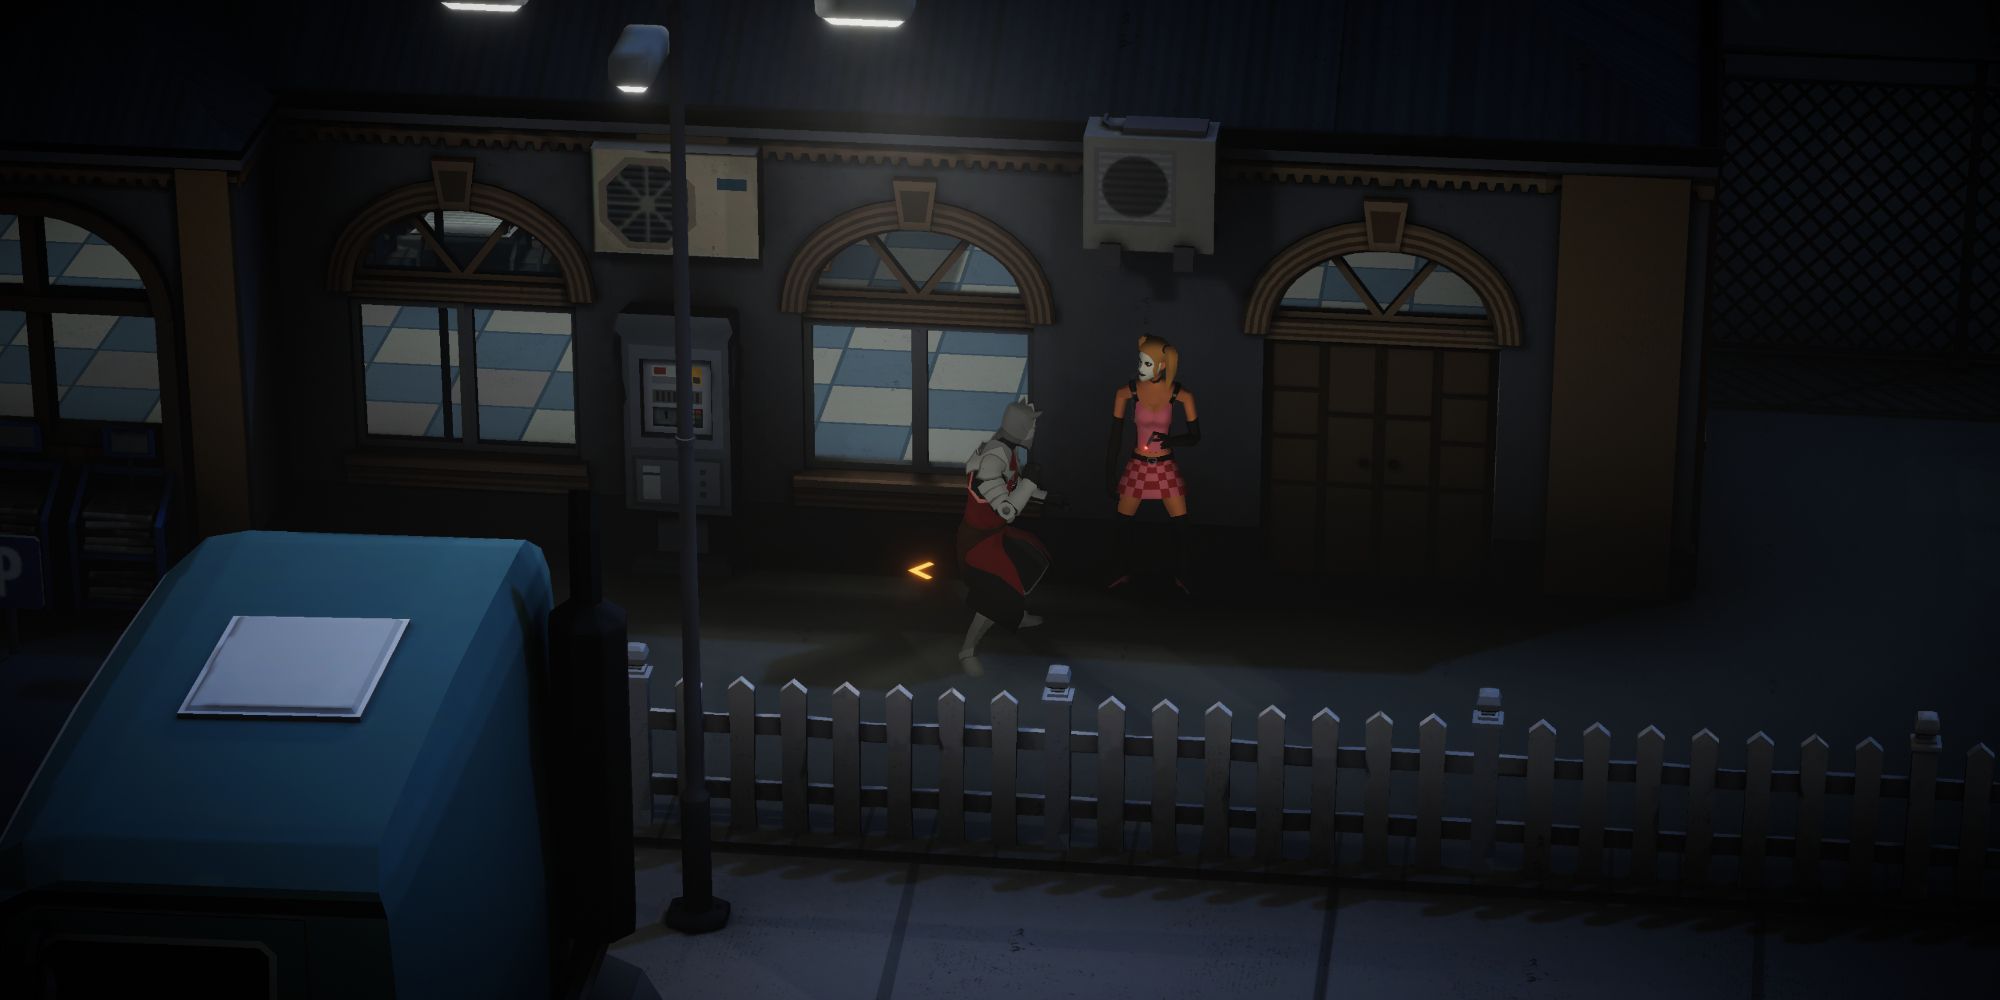
Keeping pace with another easily findable Special Character is the second one, found in the fifth mission, Restroom. Your target will be in the bottom right corner of the restroom and dressed in a knight suit playing a game while doing his business. However, the unfortunate part of this is that you must eliminate every enemy in the stage before you can talk to this Special Character. So, just beat the many waves of enemies up until the game tells you to leave the bathroom, then make your way over to them and give them a shout!
- Mission 5 – Restroom
Return to Special Character Quicklinks
Special Character #3
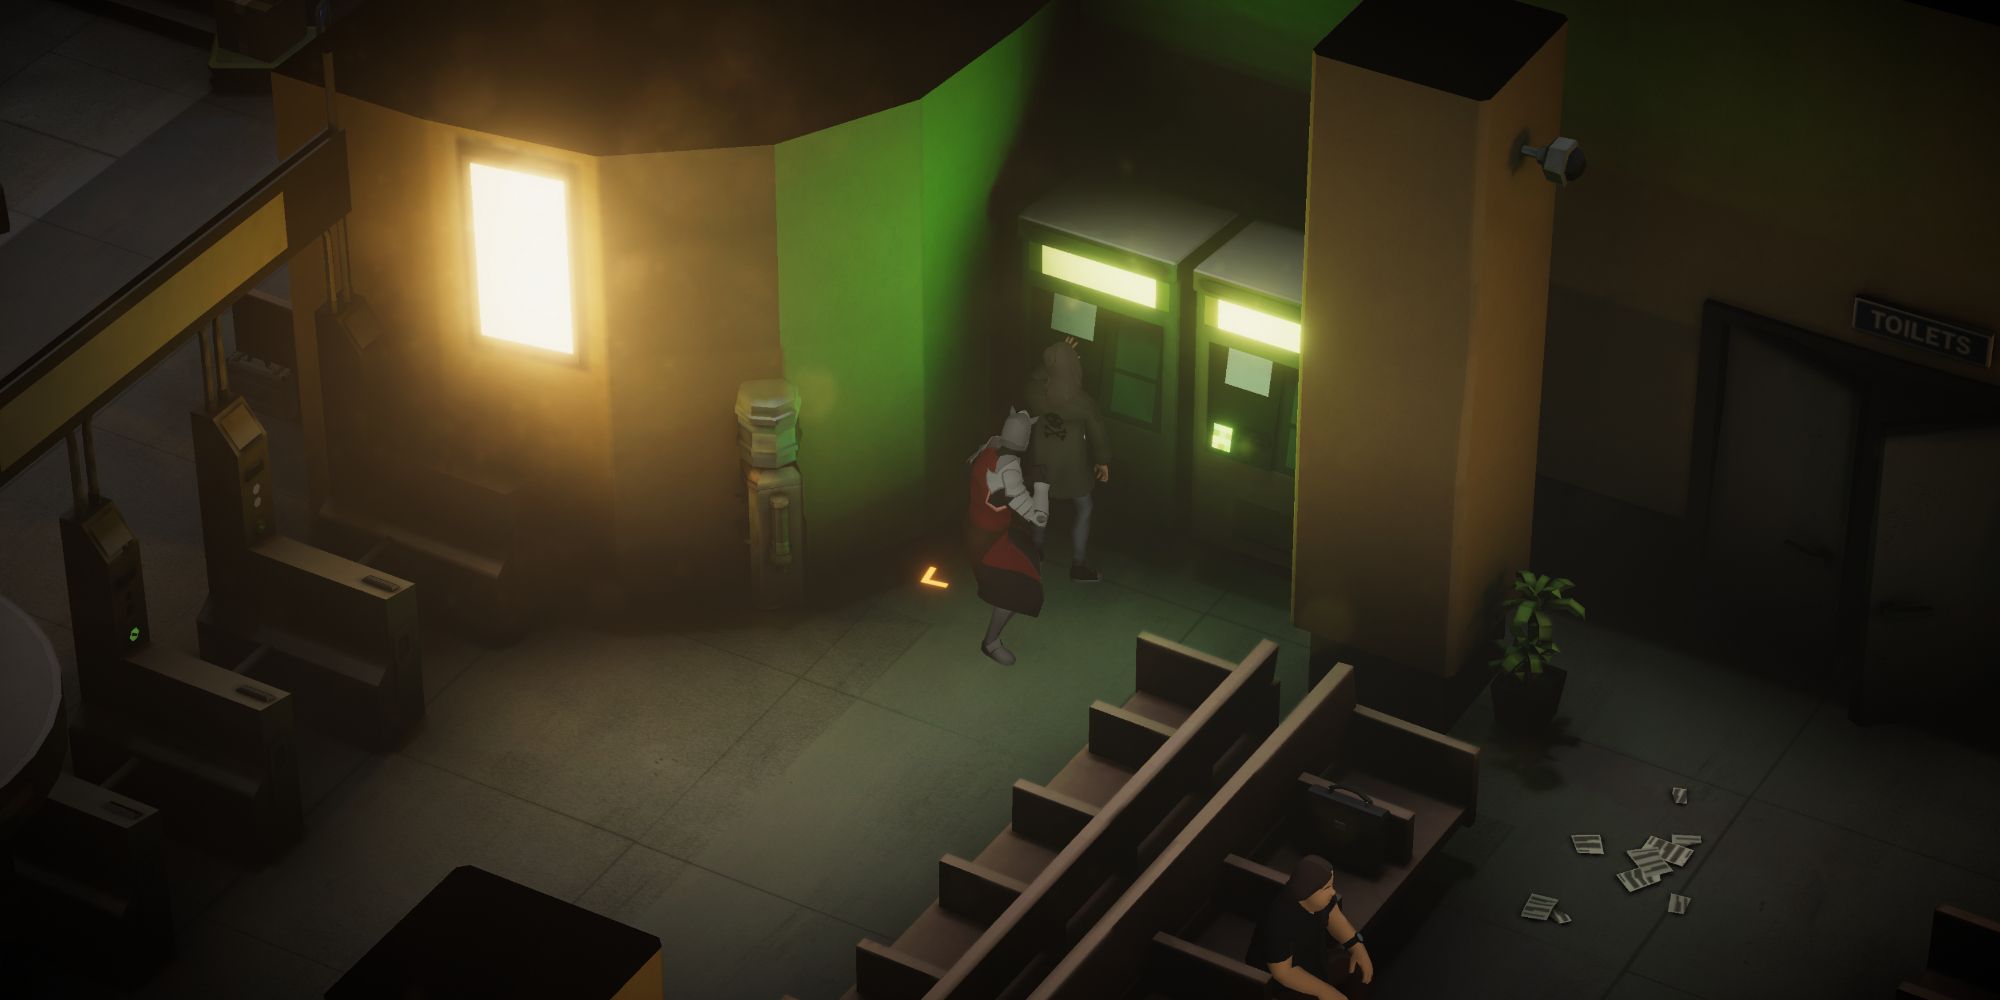
If you thought the other two were low-effort, wait until you meet the third Special Character, who is located in the sixth mission, Abandoned Metro. As soon as the mission starts, you will find yourself in a small waiting room. In this room, there will be ATMs against the right wall. Your target is using one of these machines!
- Mission 6 – Abandoned Metro
Return to Special Character Quicklinks
Special Character #4

Reminiscent of the second Special Character, the fourth Special Character is easy to find but cannot be spoken to until after you have eliminated every enemy in the stage. So, as a result, beat down every oncoming wave on enemies while dodging the train until the game asks you to hop down a hole into the sewers. At this point, walk past the left train tracks to find an electrician working on a circuit breaker. That's your target!
- Mission 7 – Train Tunnel
Return to Special Character Quicklinks
Special Character #5
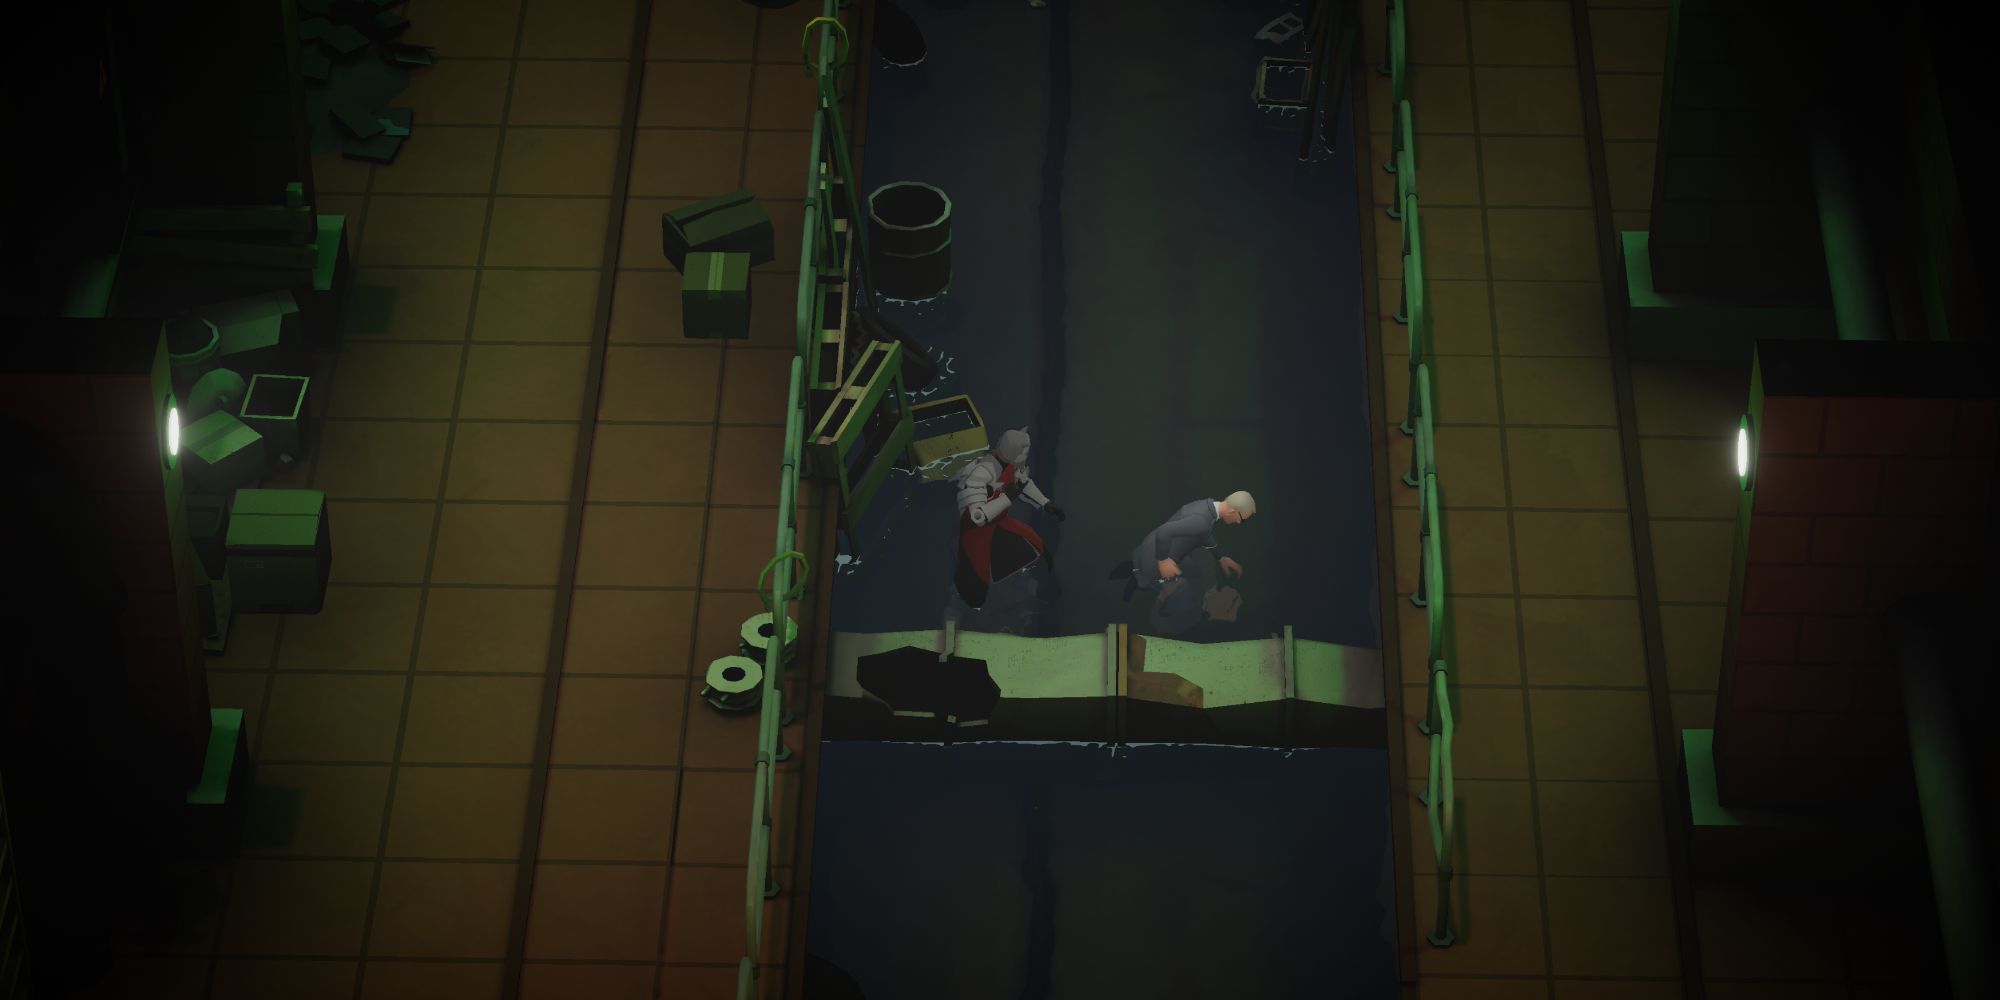
Another straight-to-the-point one is the fifth Special Character, who you will find in the eighth mission, Sewers. To get to them, walk a little bit forward as soon as the level starts until you see a staircase that leads into the water on the right. Take the stairs and walk towards the screen until you see a man rummaging through sewage water, looking for something. This broken person is your target!
- Mission 8 – Sewers
Return to Special Character Quicklinks
Special Character #6
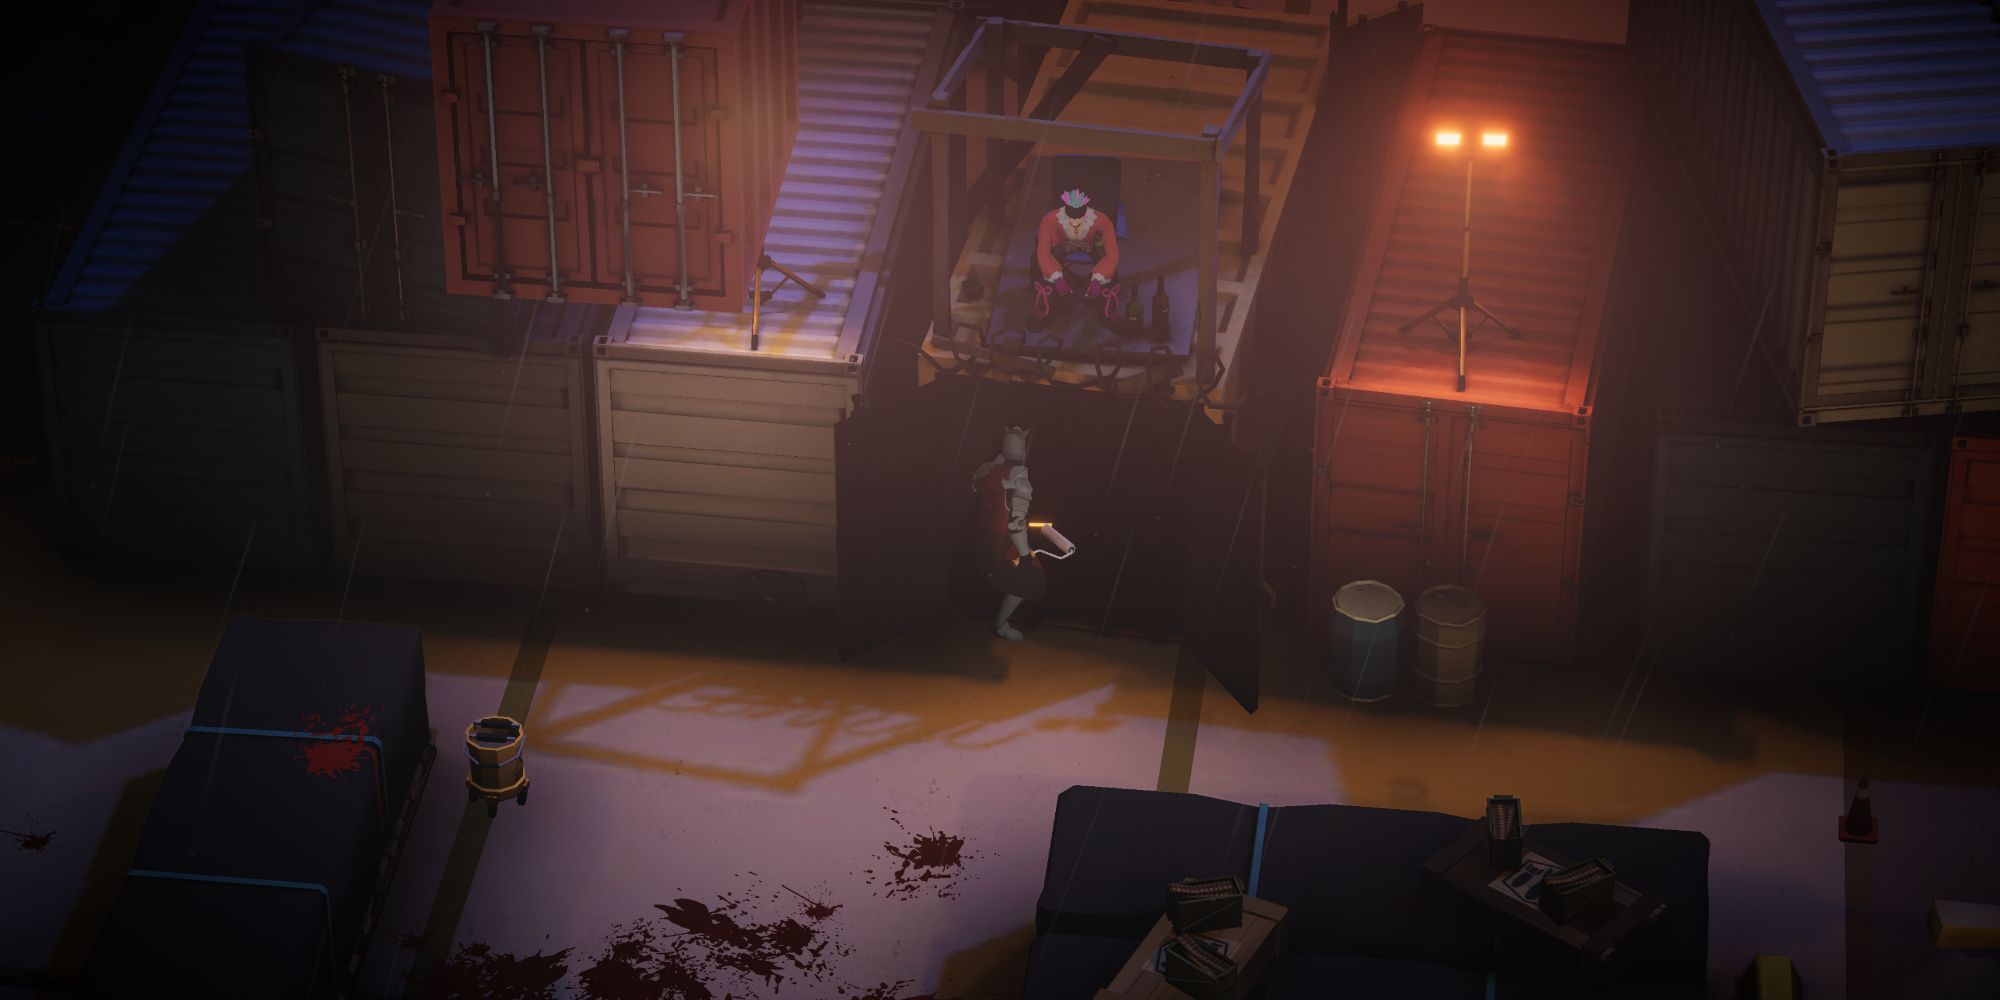
The sixth Special Character finally shakes up the formula of placing them near or at the start of every level. Mission nine, Shipyard, is where you will find this target, and they are located towards the end of the level. To find them, make your way through the level as your normally would by taking out enemies and avoiding the crane operator trying to squish you with a crate.
You will eventually reach a point where the crane operator stops pursuing you, and you will have to pass through a large shipping container to another section of the mission. Your target will be located on top of the shipping container, just above its entrance. You can pass through the shipping container, obtain the Secondary Gun as you usually would, and head backward to speak with them, but if you climb up the crane, you've gone too far and have to restart the mission.
- Mission 9 – Shipyard
Return to Special Character Quicklinks
Special Character #7
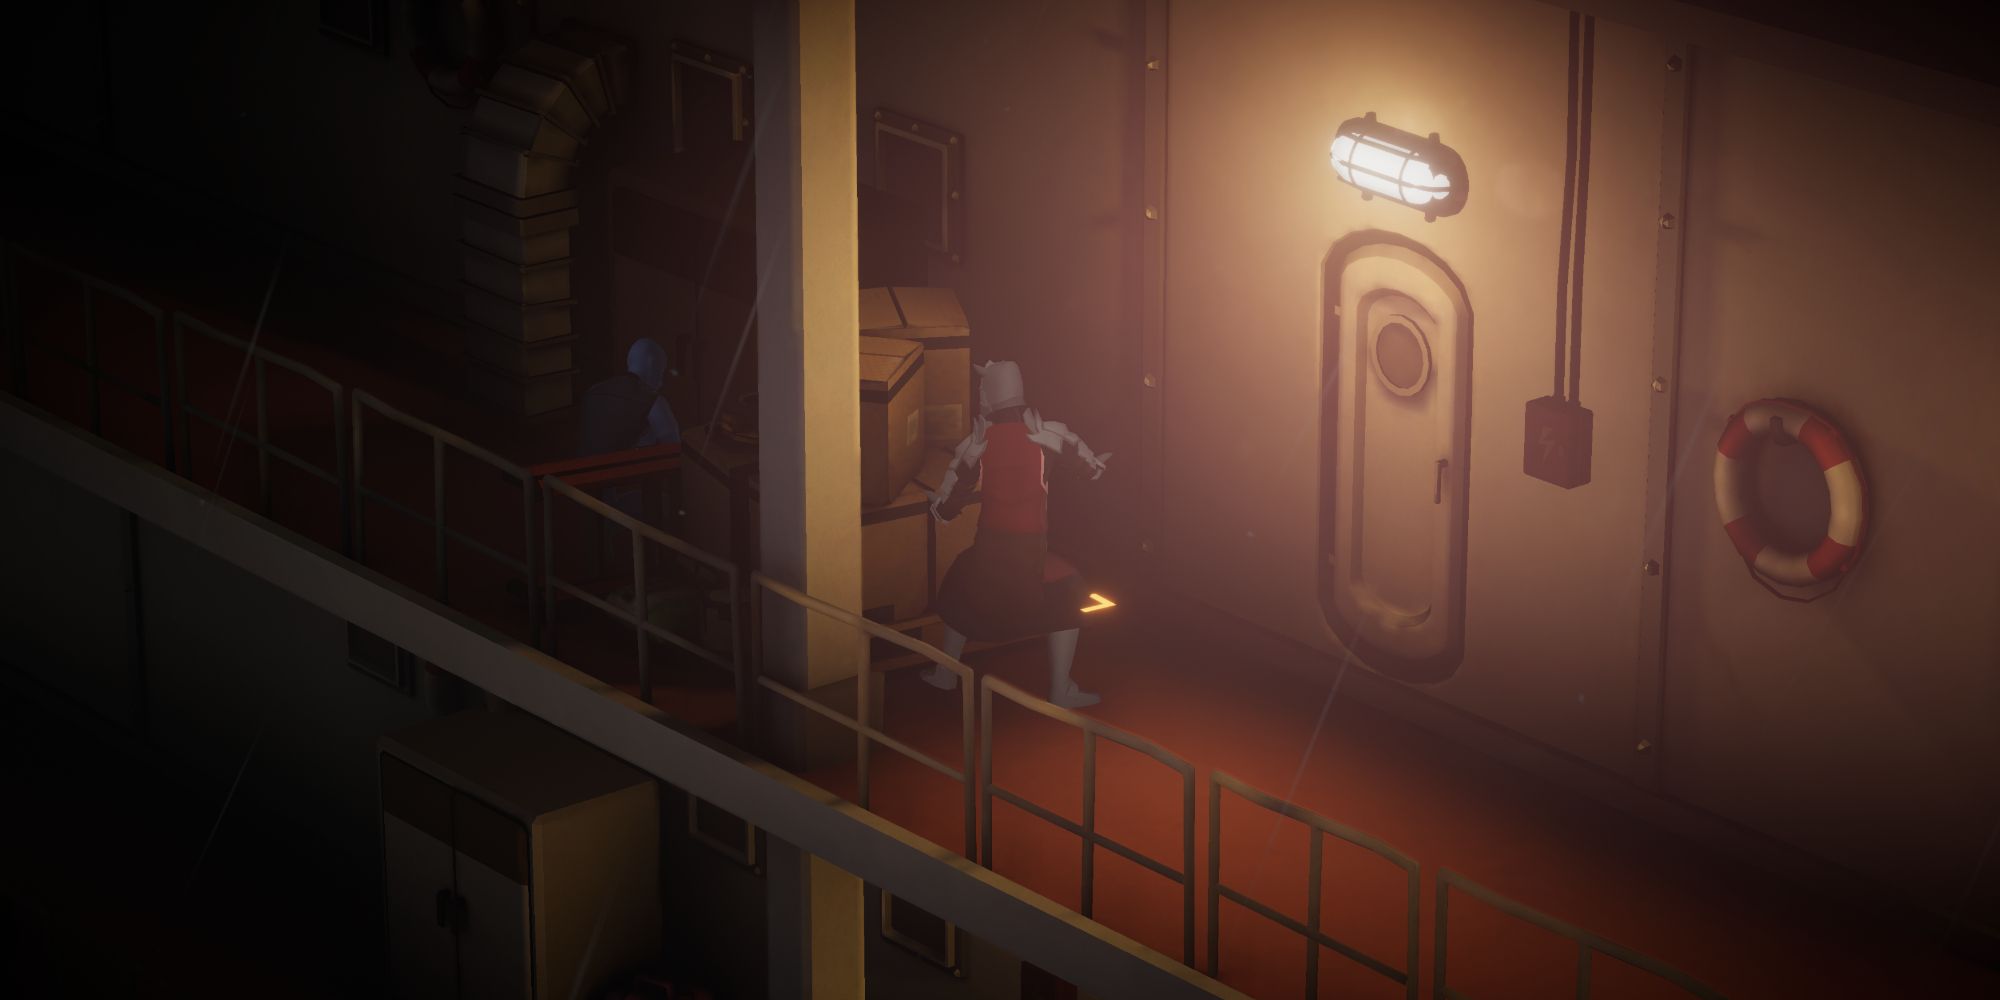
Your seventh Special Character is located aboard mission ten's S.S. Muggler and is found about midway through the level. To find your target, proceed through the mission until you reach the section after the Sailermen show up, where you have to ascend a series of staircases to reach the top of the ship. After climbing the second set of stairs, hook left instead of following the marker to find this Special Character huddled behind a pile of boxes!
- Mission 10 – The S.S. Muggler
Return to Special Character Quicklinks
Special Character #8
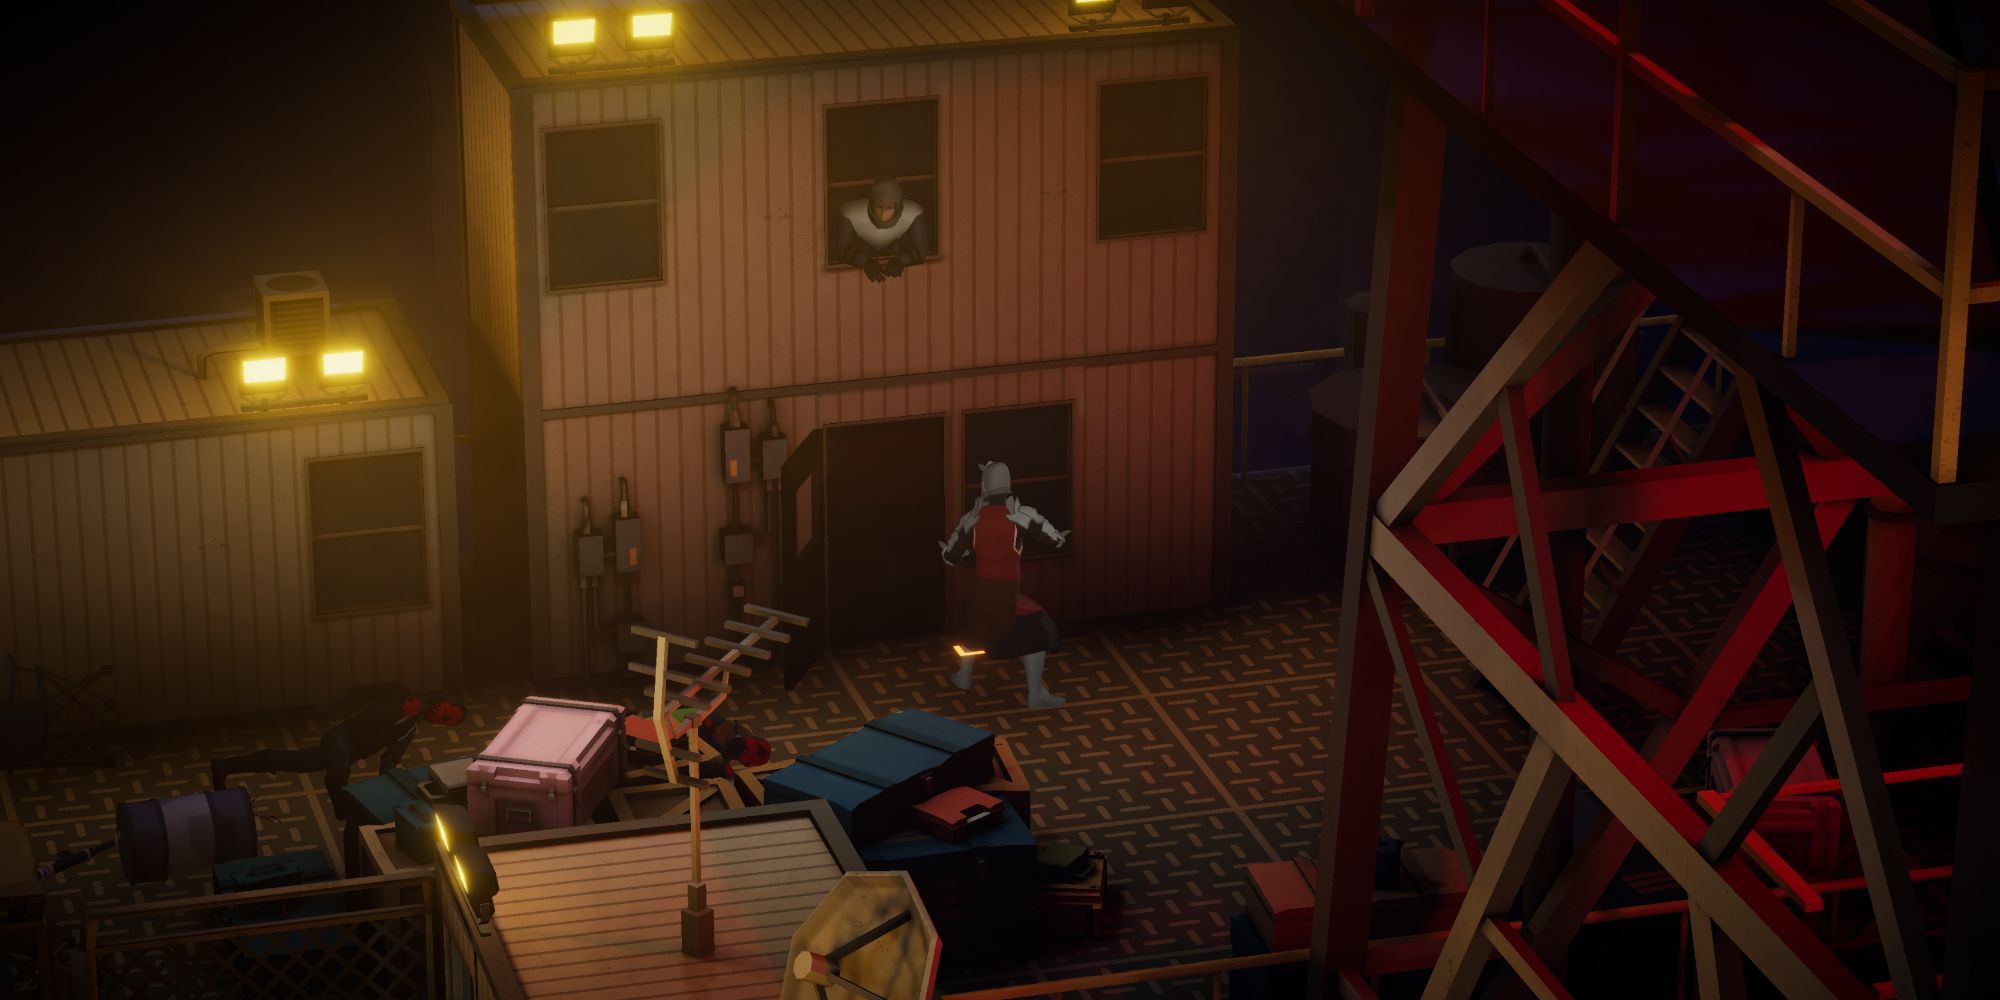
After the events of the S.S. Muggler, you will find yourself in the game's 11th mission, Oil Rig, where you will also find your eighth Special Character. To find this target, make your way through the stage up to the point you have to descend a staircase. Once you arrive at the very bottom of the stairs, look up to see a person dressed in chainmail leaning out of a second-story window. Don't ask questions, just speak to them to cross off yet another Special Character!
- Mission 11 – Oil Rig
Return to Special Character Quicklinks
Special Character #9
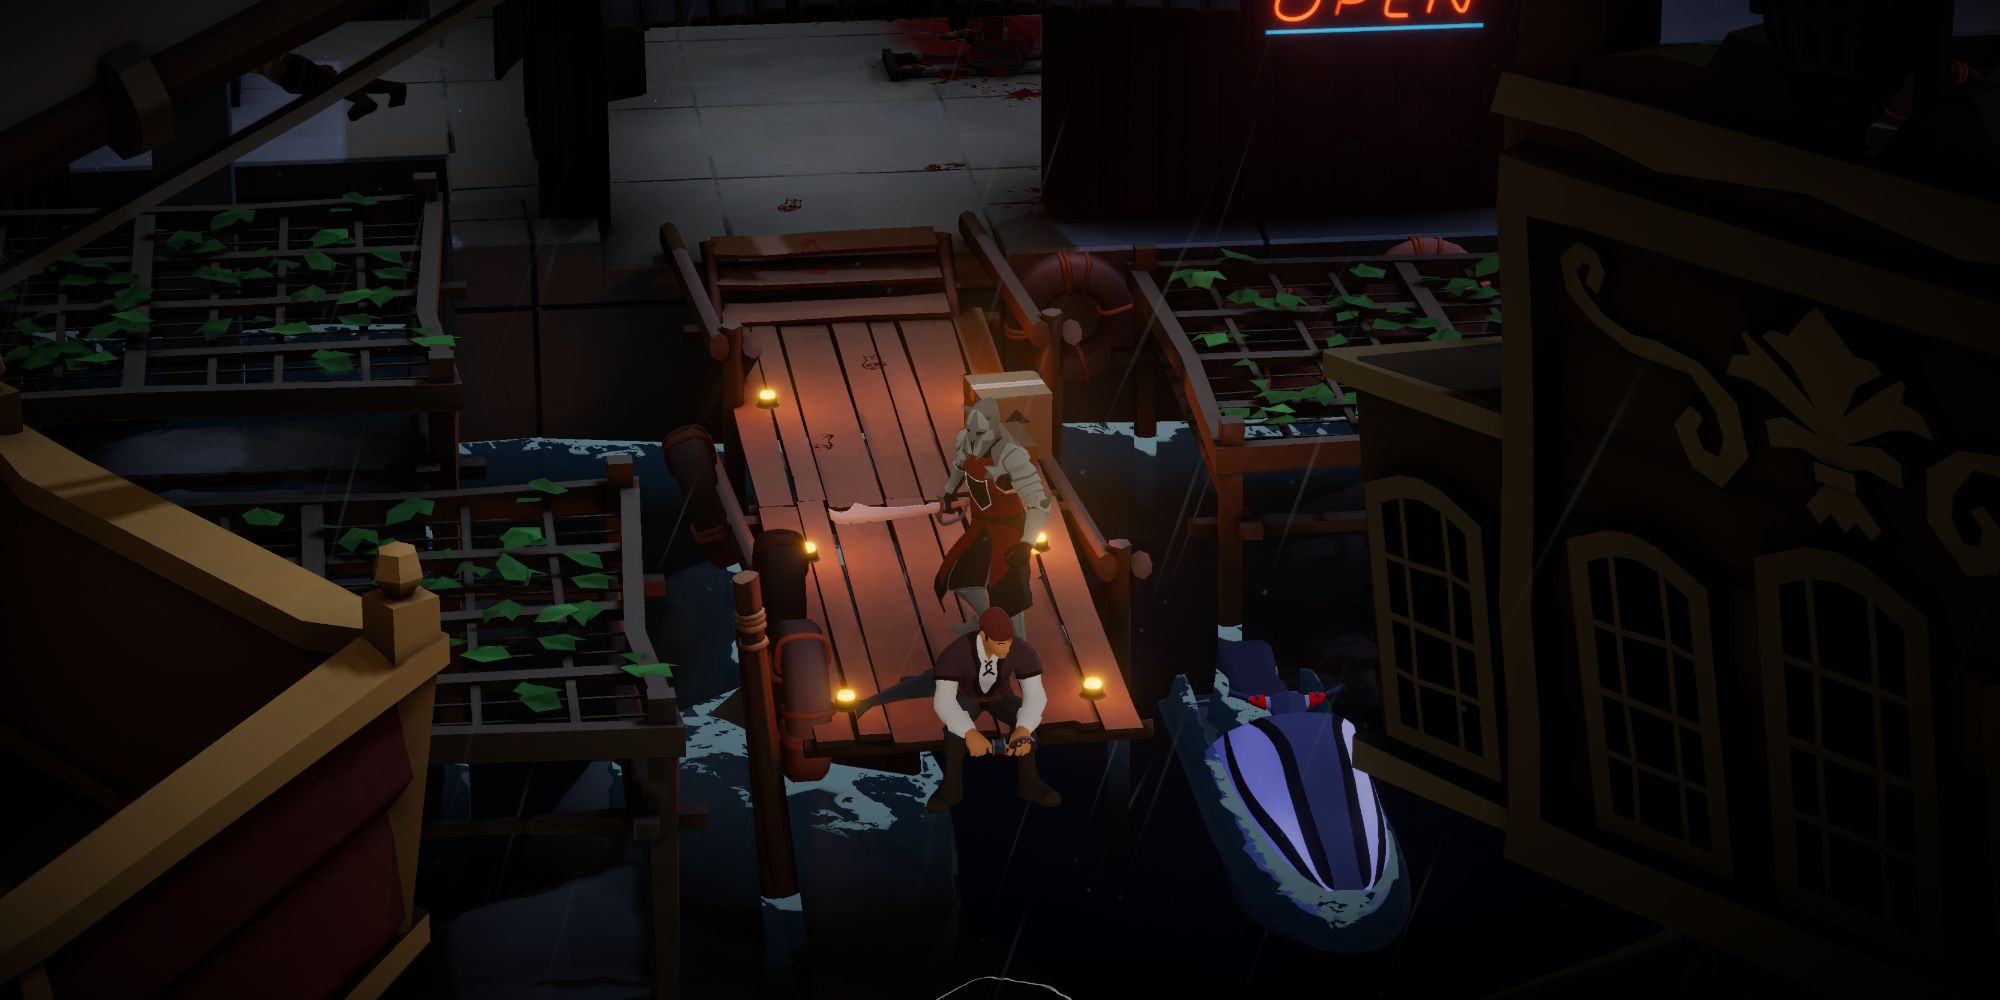
The Civilian Evacuation Center is Midnight Fight Express's 13th mission and houses your ninth Special Character. While relatively easy to find, you will have to work your way to the very end of the mission before being able to find them. Once at the last area, dispatch every baddie, then take a right to walk out onto a dock. You will see your target sitting at the edge of it, fishing his troubles away.
- Mission 13 – Civilian Evacuation Center
Return to Special Character Quicklinks
Special Character #10
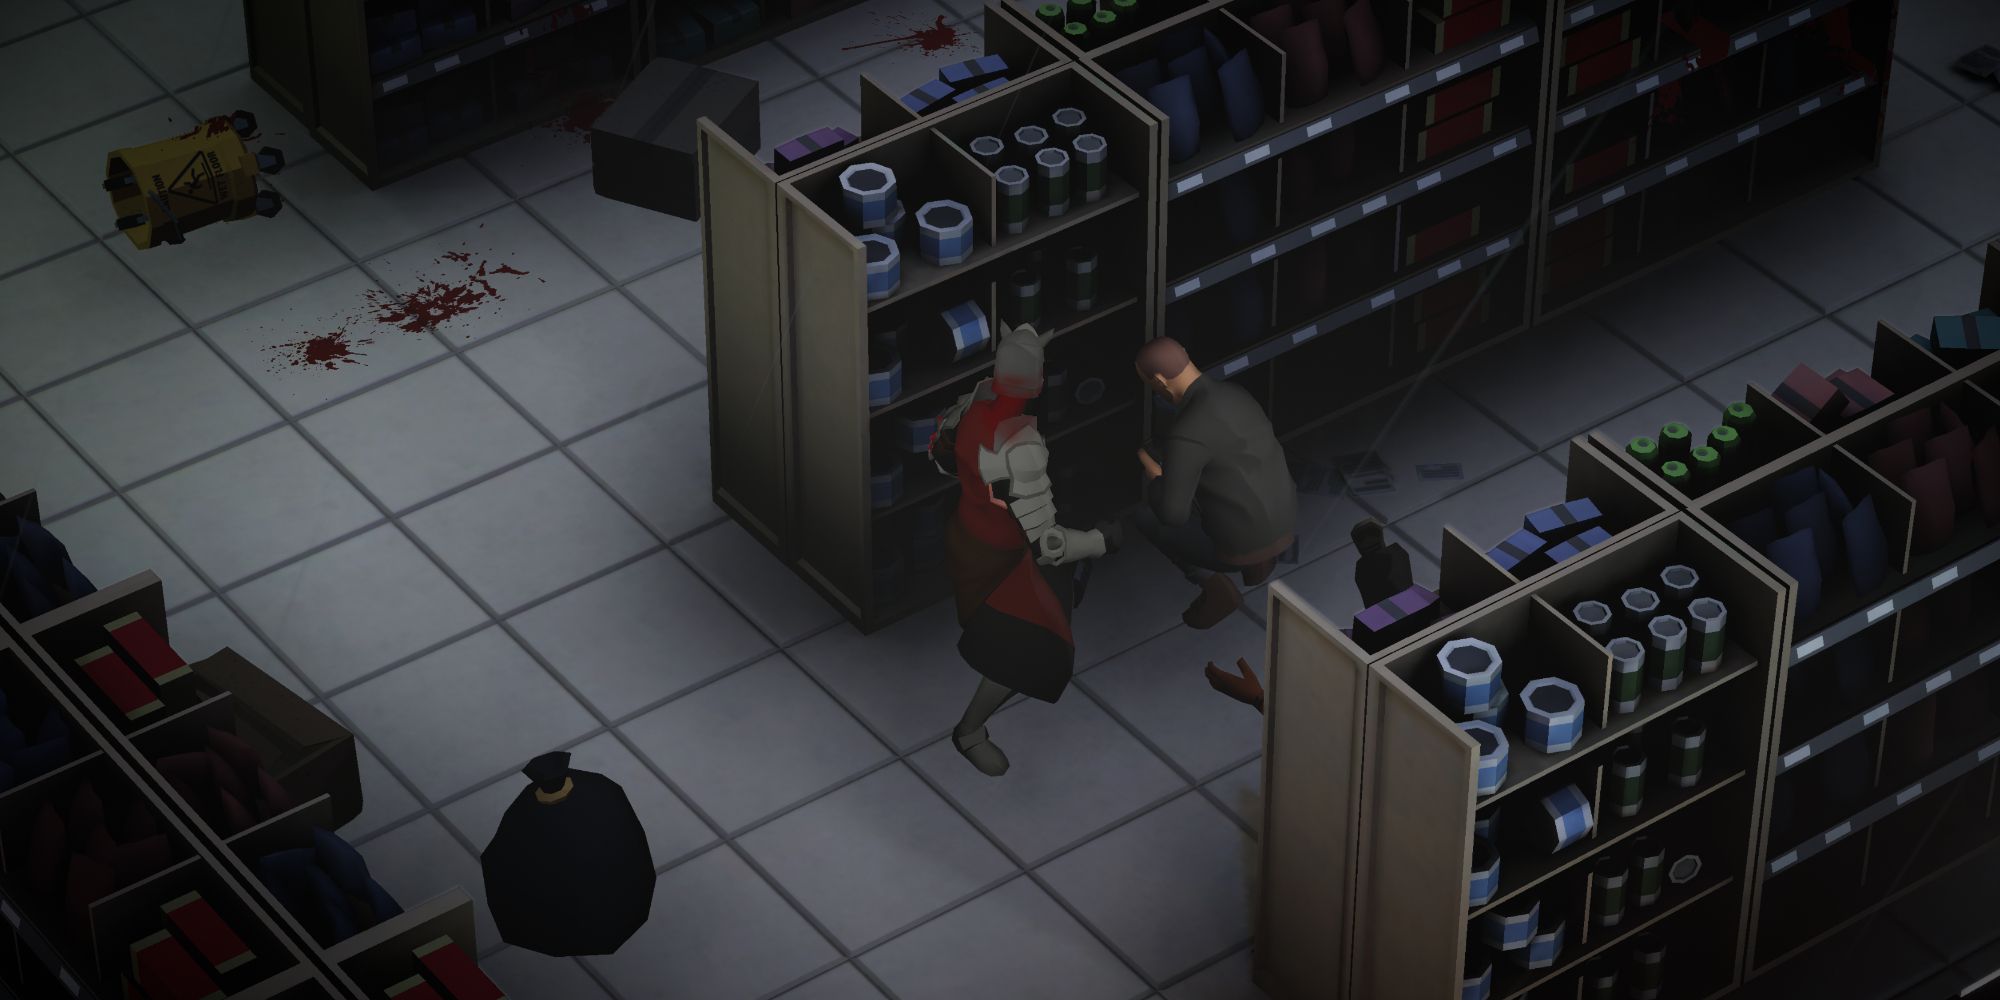
Special Character number ten is probably the trickiest of the bunch and requires some timing to have them appear. However, it's not all bad once you know where to go and what to do. The 14th mission, Gas Station, is where your target will be, and you will have to progress all the way up to the section where you enter the gas station.
Once inside the gas station, eliminate the enemies and then speak with the person hiding inside the cabinet to advance the mission. Immediately after this, the game will tell you to exit the gas station. However, instead of doing that, check the isles of the gas station to find someone looting the store. Speak to them to bag another Special Character!
- Mission 14 – Gas Station
Return to Special Character Quicklinks
Special Character #11
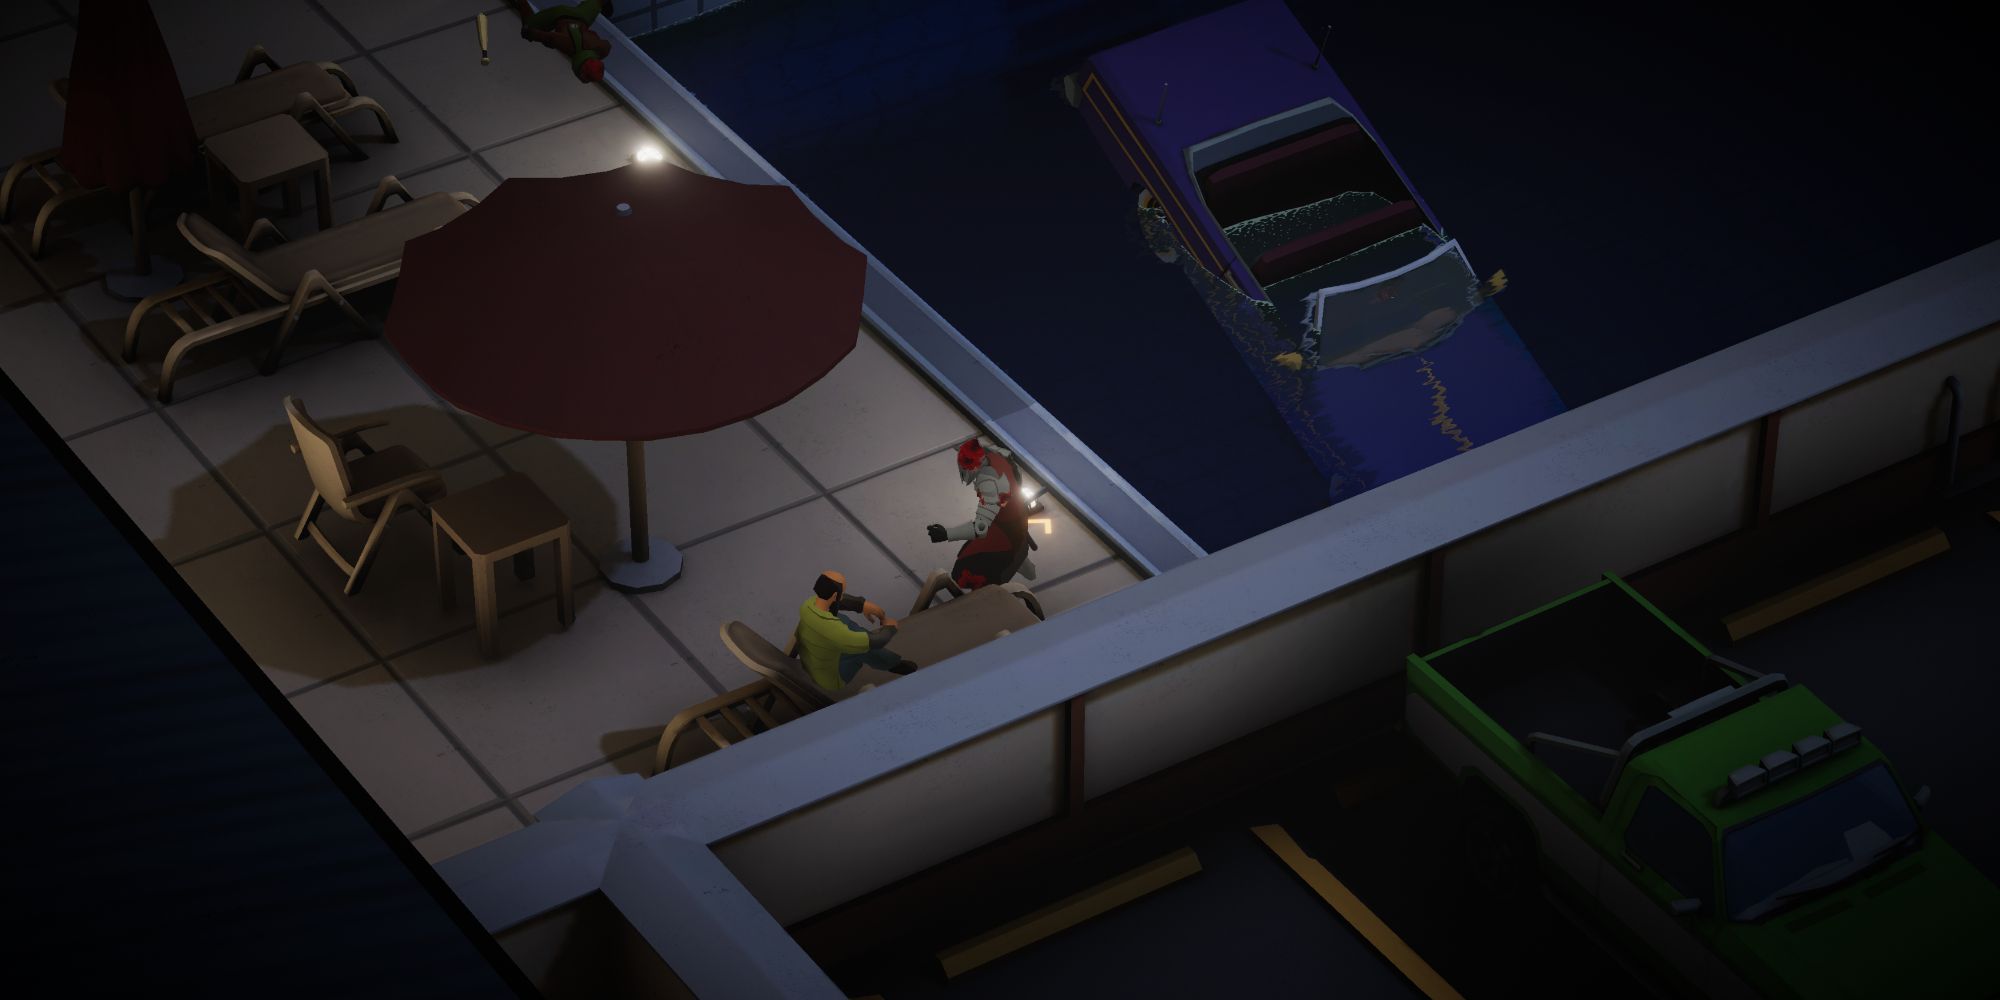
Mission 15, Motel, is where you will find your 11th Special Character. To reach them, simply make your way to the area where a lowrider plows through a wall and into a swimming pool. Once here, your target will be in the bottom right corner of the screen, chilling on a lounge chair, taking in the scenery. However, before speaking to him, you must eliminate all enemies in the area. Just don't progress to the next area, or your shot is blown, and you have to start over.
- Mission 15 – Motel
Return to Special Character Quicklinks
Special Character #12
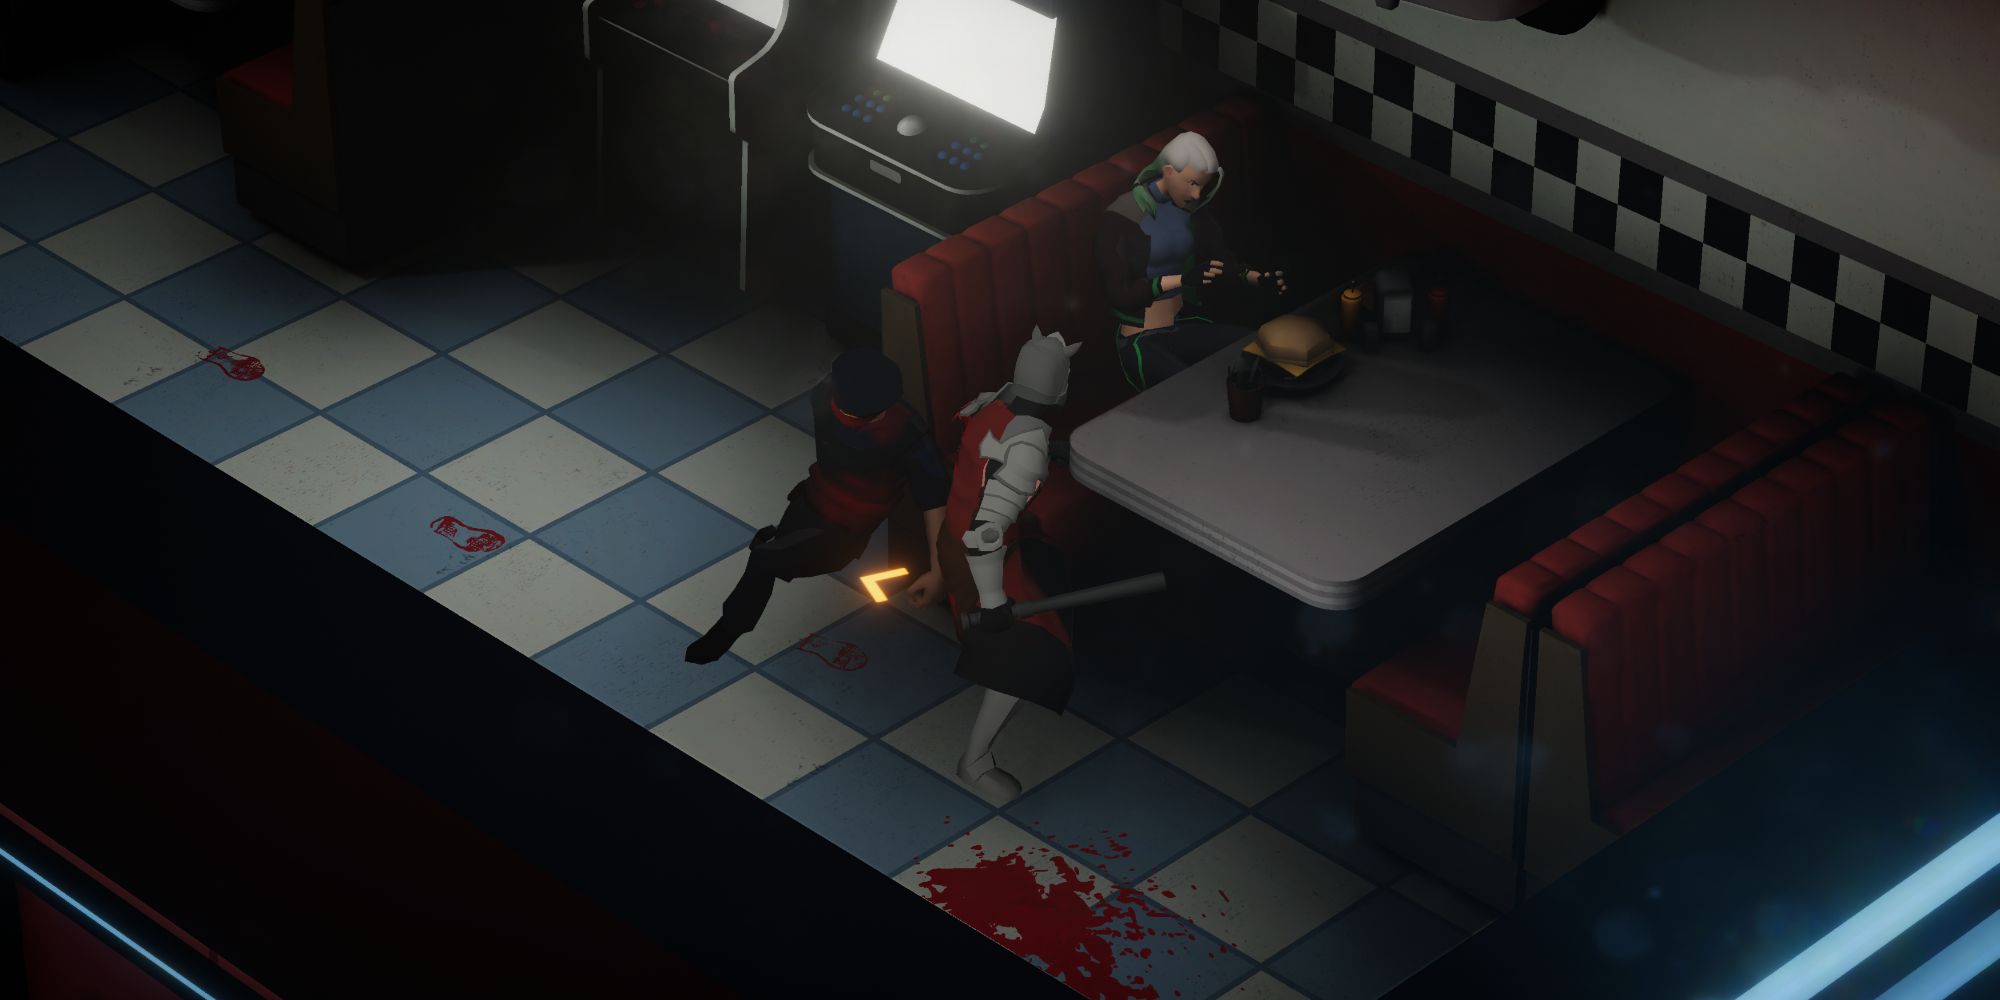
Special Character 12 returns to the simpler times, placing your target at the very start of mission 16, Hawthorn Diner. Your target will be sitting at the booth directly in front of the door you enter the diner with, sizing up the enormous burger on her plate. However, much like some other entries, you must dispatch all enemies in the area before you can speak to her.
- Mission 16 – Hawthorne Diner
Return to Special Character Quicklinks
Special Character #13
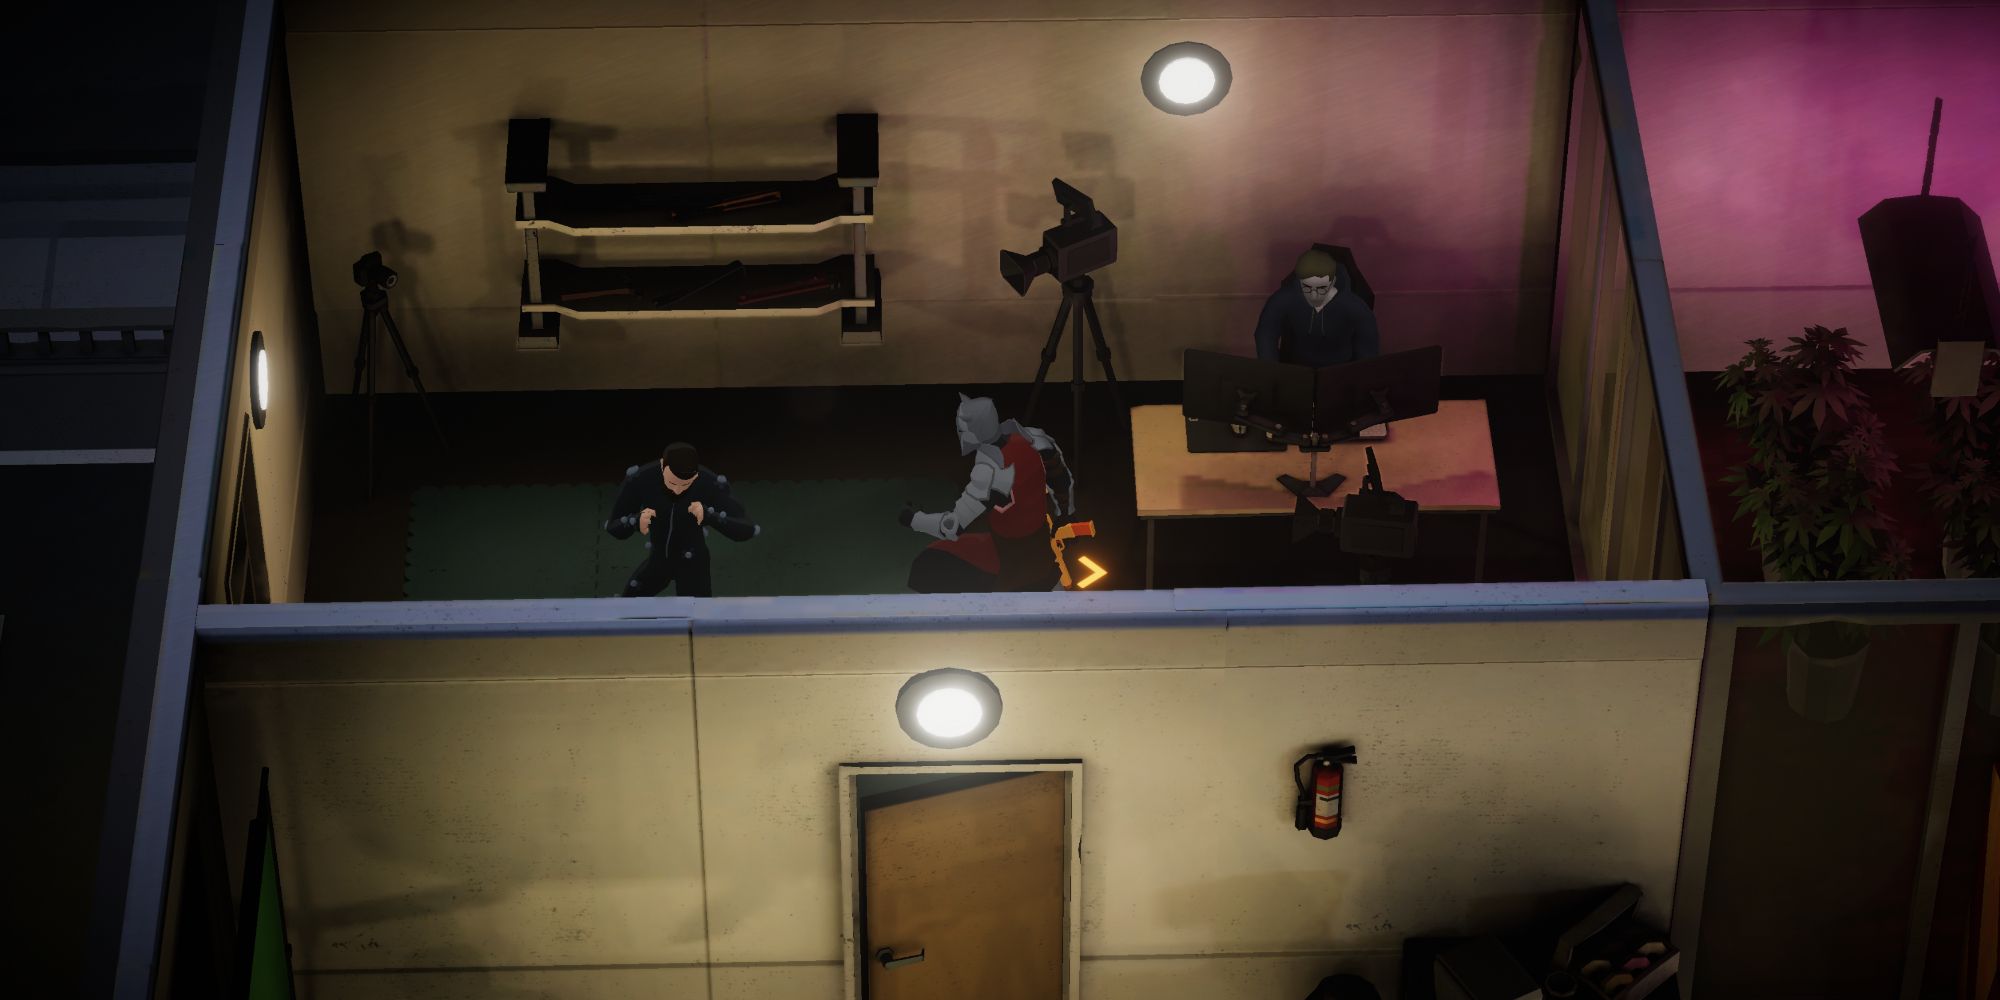
Probably the best mission in the entire game is the 17th mission, Game Studio, which features a large-scale pillow fight and Nerf-toy war. Your 13th Special Character will be found on the last floor you reach, tucked away in a room located in the top left corner. The person you are looking for is mocapping combat for, well, this game, presumably, and you can gain access to the room by simply besting everyone in the area with your god-like pillow fighting skills!
- Mission 17 – Game Studio
Return to Special Character Quicklinks
Special Character #14
Reverting back to the original layout, the 14th Special Character is found at the very start of mission 18, Train Station. As soon as the level begins, do not enter the Train Station. Instead, walk up the narrow pathway to the right of it to find your target leaning against the wall at the end of the building.
- Mission 18 – Train Station
Return to Special Character Quicklinks
Special Character #15
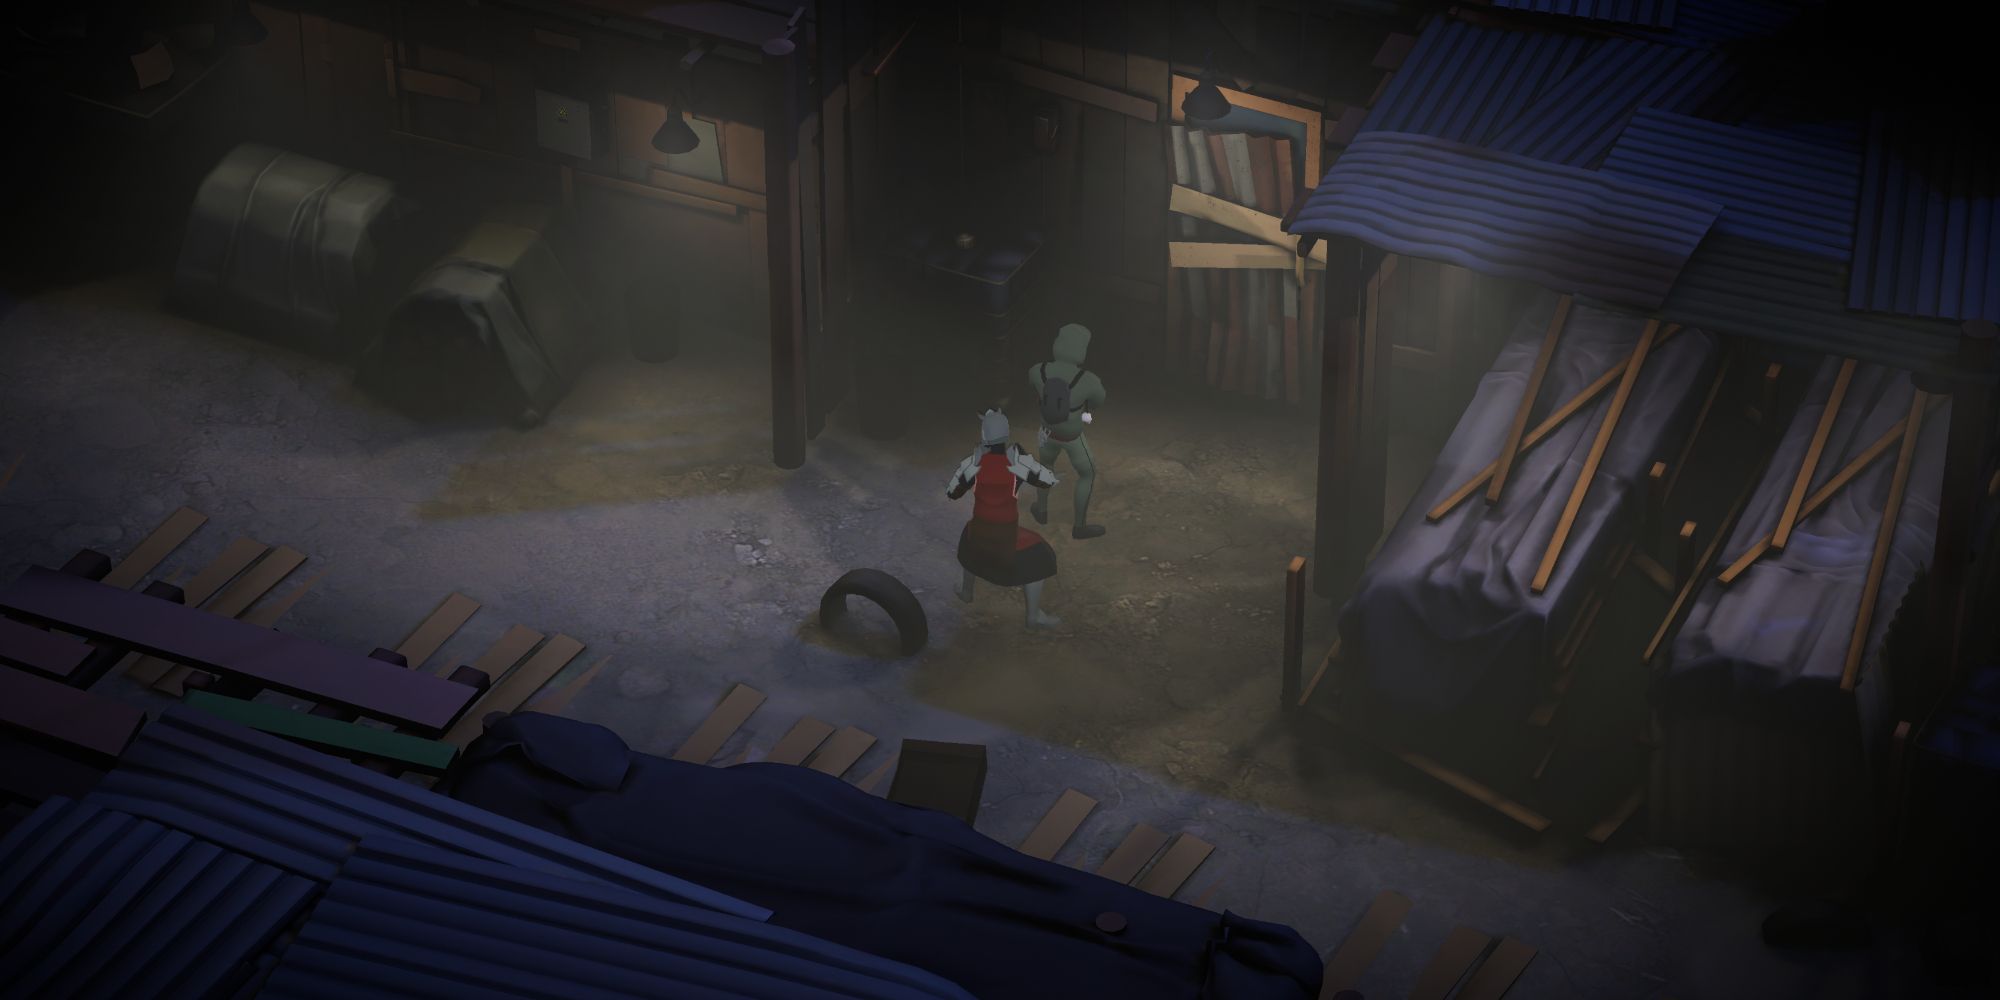
Special Character 15 shares a similar tale as the previous one and is located at the beginning of mission 19, Slums. As soon as the level starts, walk forward until you see a hooded person with a backpack staring at a barricaded door. Speak with them to cross them off your checklist!
- Mission 19 – Slums
Return to Special Character Quicklinks
Special Character #16
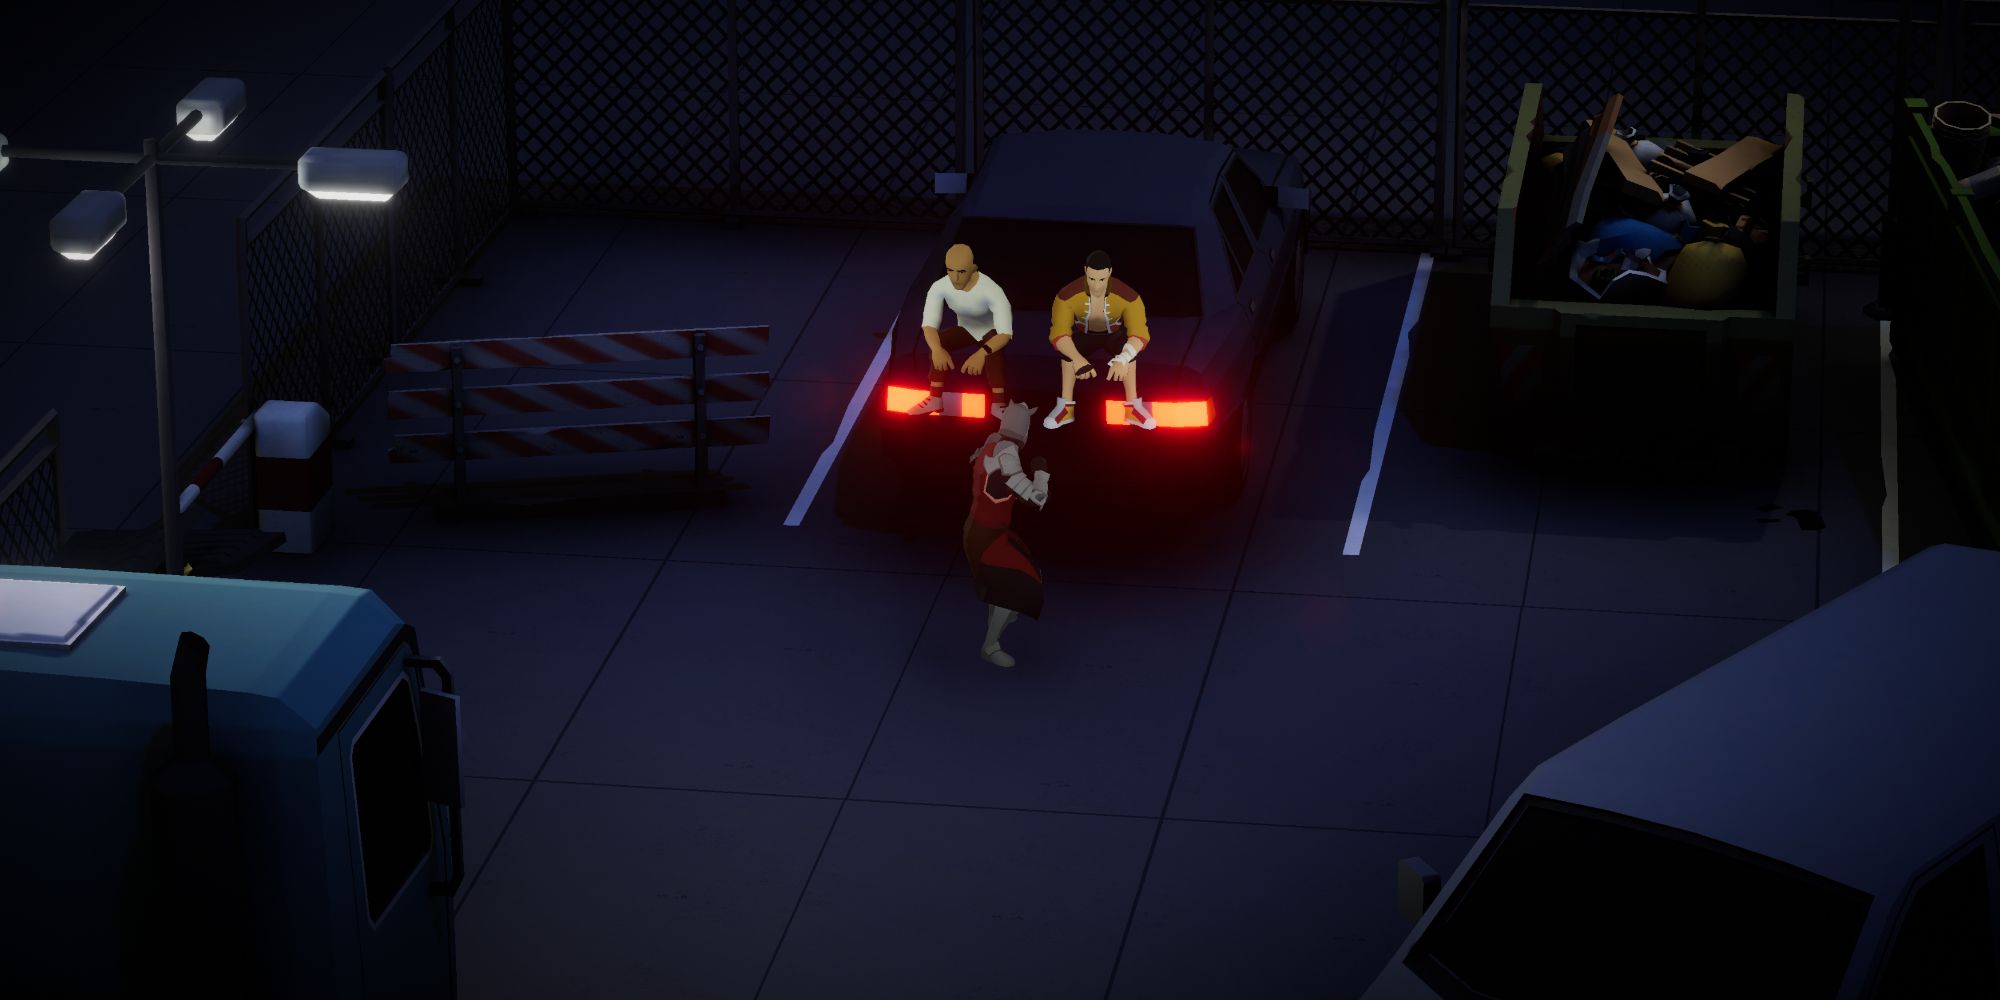
Mission 20, Fight Club, is where you will find your 16th Special Character, who is also located at the very start of the level. To find your target, as soon as the mission begins, simply walk straight ahead until you reach two people sitting on the trunk of their car. Easy as that!
- Mission 20 – Fight Club
Return to Special Character Quicklinks
Special Character #17
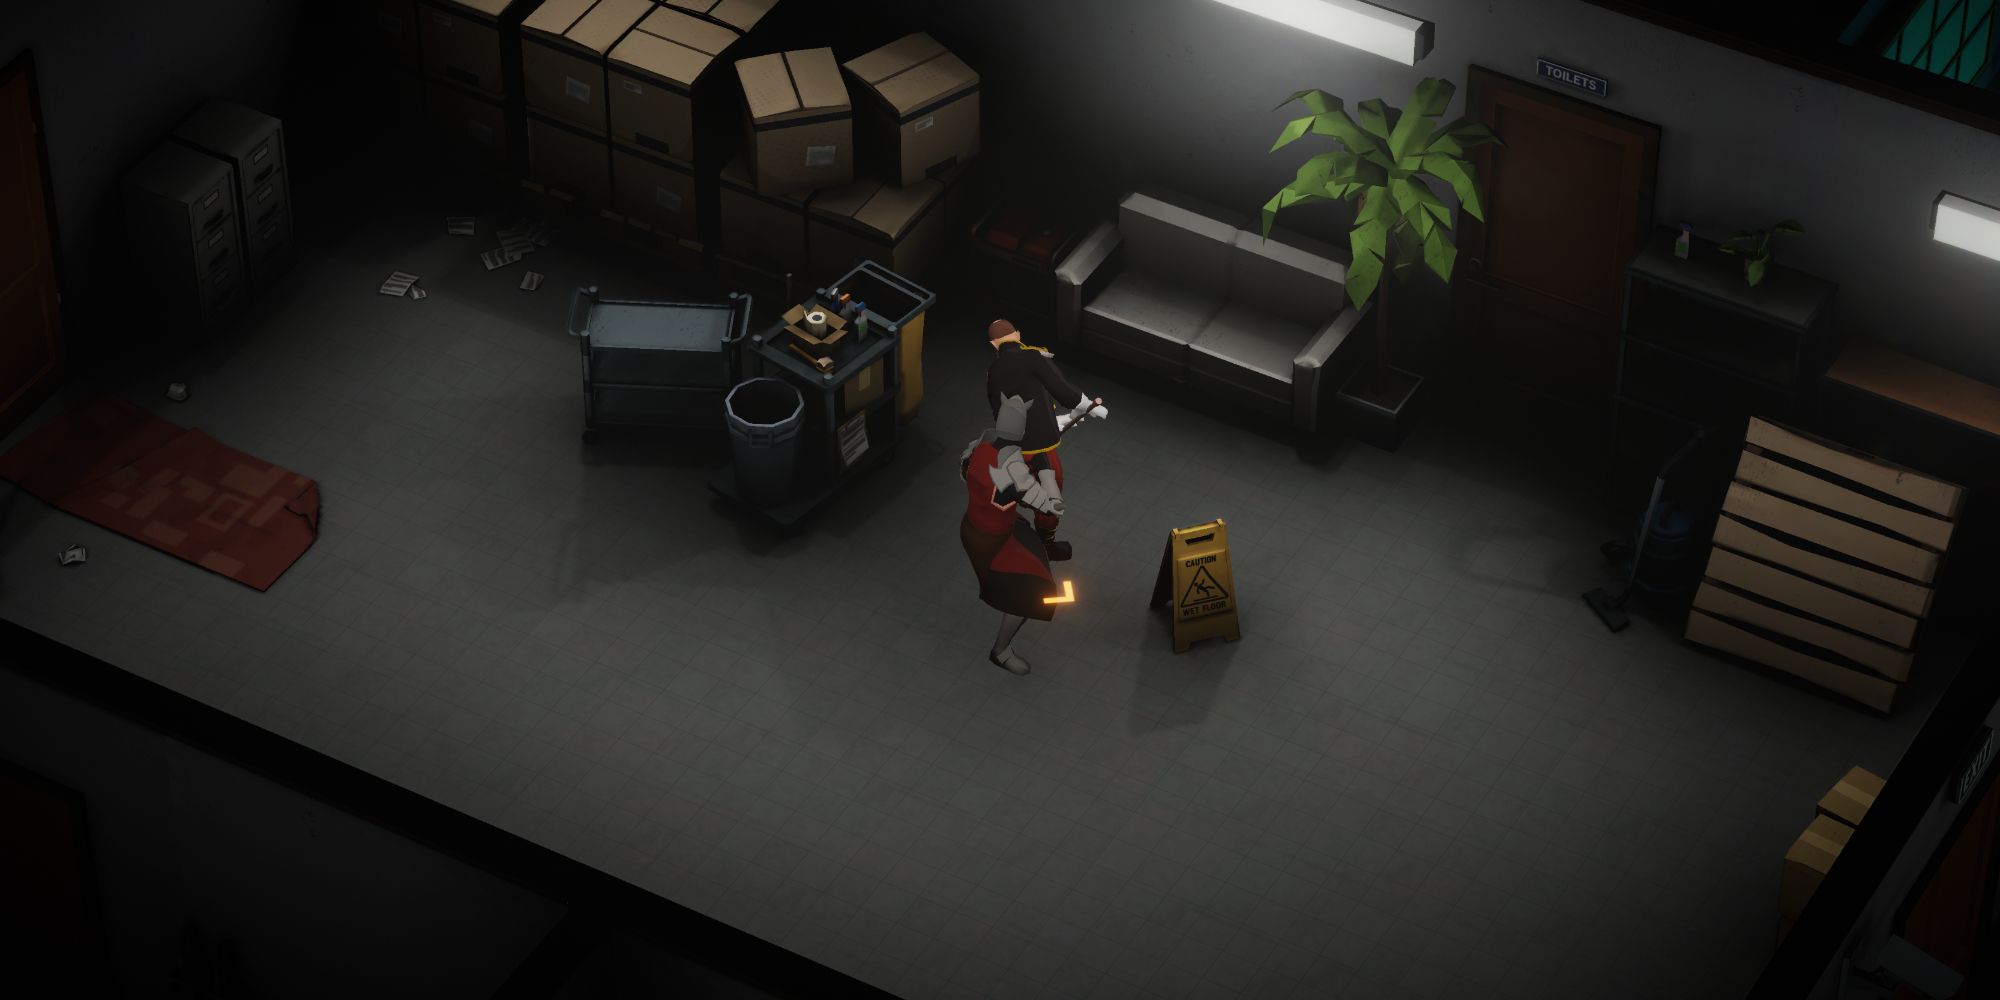
More of the same is mission 21, Tavern, which houses your 17th Special Character at the very start of the level. As the level opens, you will see a janitor mopping the floors. Speak with them to confirm another Special Character in Midnight Fight Express!
- Mission 21 -Tavern
Return to Special Character Quicklinks
Special Character #18
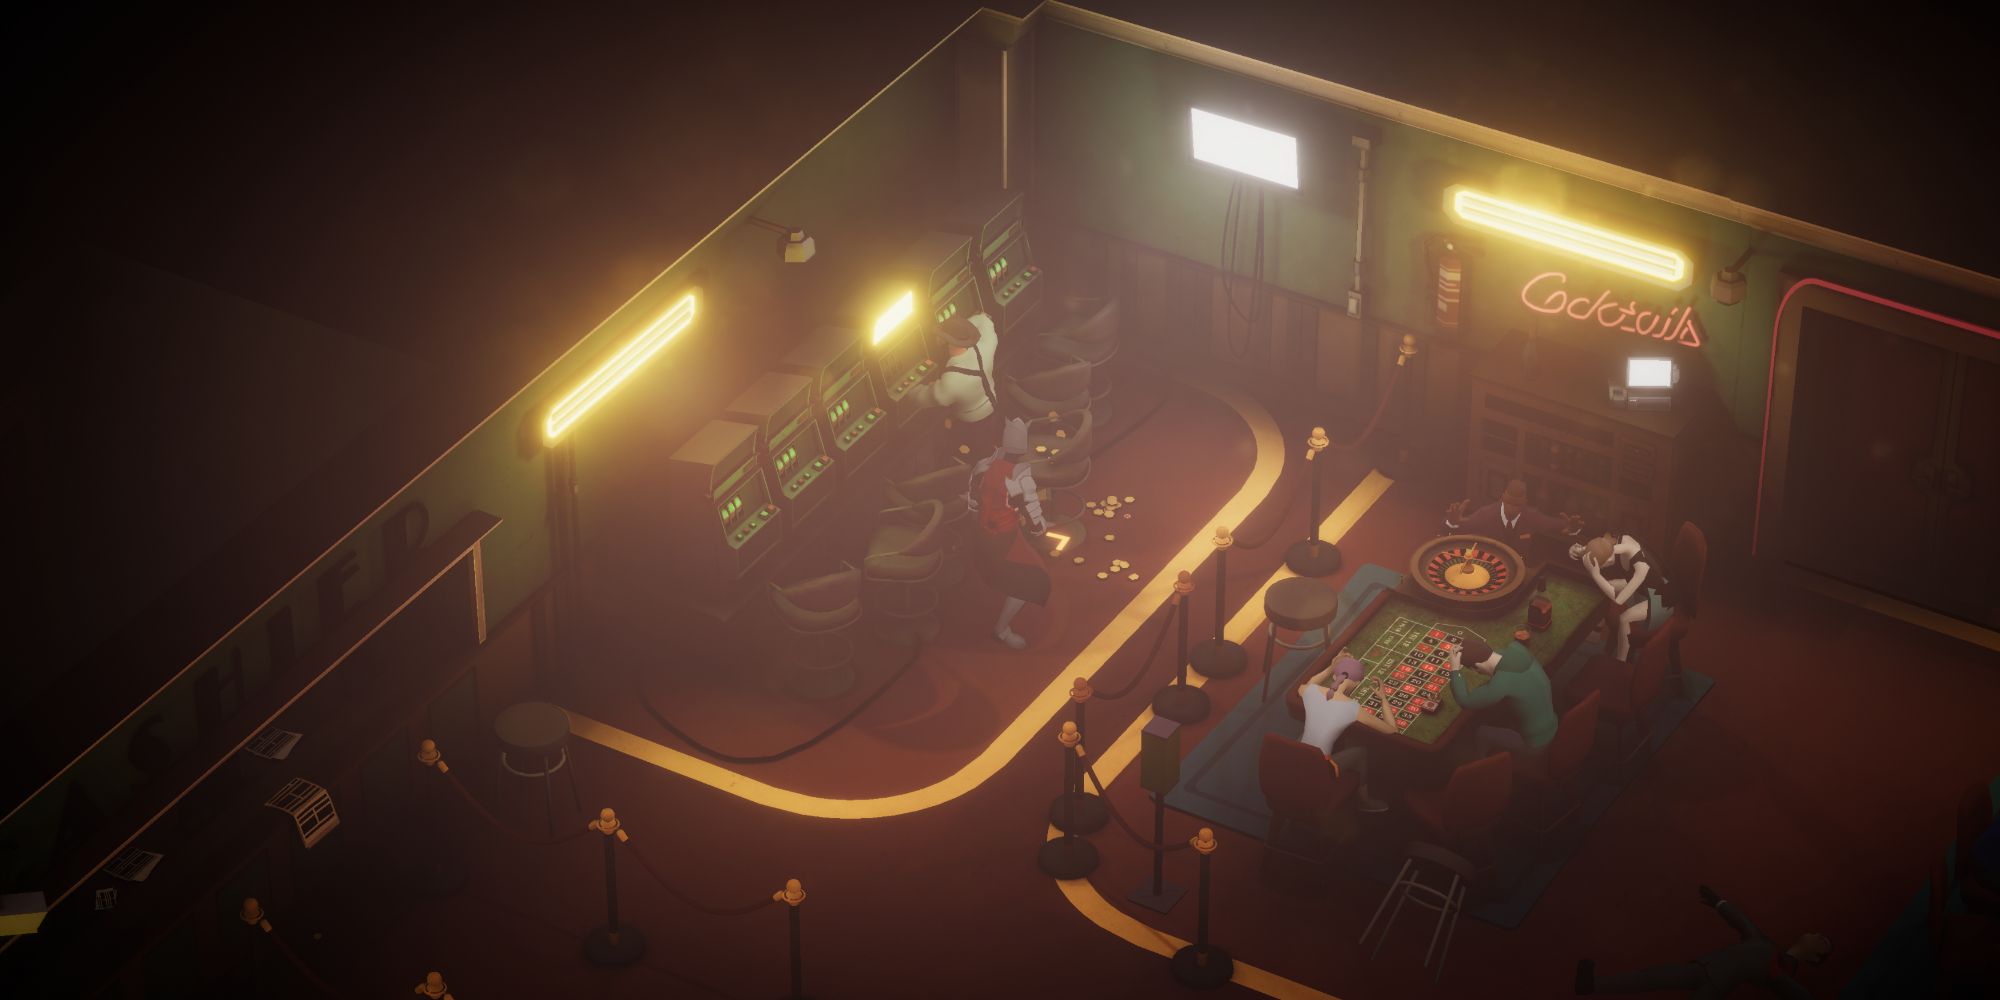
A bit more involved than the past few but still incredibly straightforward to find is the game's 18th Special Character, located inside the Russain Casino in the 22nd mission. When the level begins, you will have to fight through a few rooms before reaching the Casino. Once inside, you can find your target jumping with excitement in the top left corner of the room. However, like most others on this list, you must eliminate all enemies before speaking to the lucky bugger.
- Mission 22 – Russain Casino
Return to Special Character Quicklinks
Special Character #19
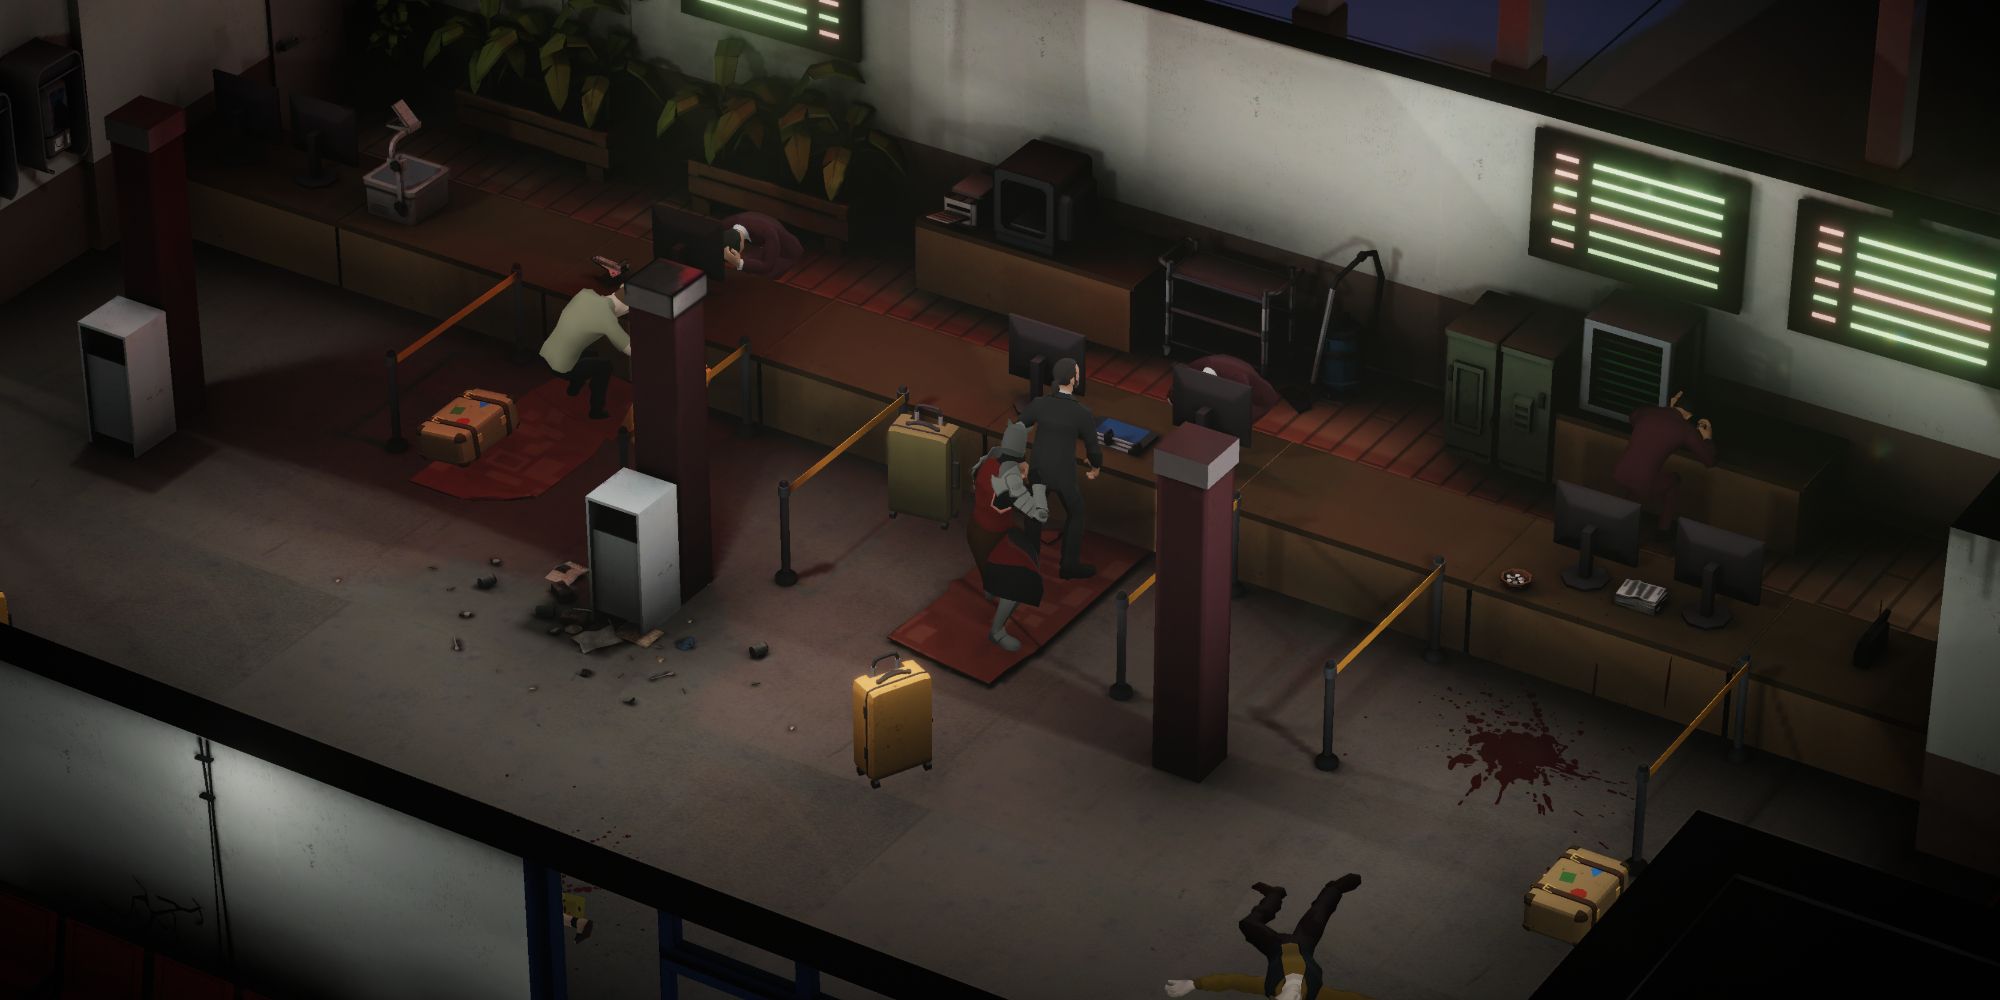
Mission 24, Airport, sees things dip back into the express lane by placing Special Character 19 at the start of the mission. To reach your target, enter the Airport, look for the man arguing with the ticket agent, and speak with them. No fighting or anything involved. Just load the mission up, walk into the Airport and talk!
- Mission 24 – Airport
Return to Special Character Quicklinks
Special Character #20
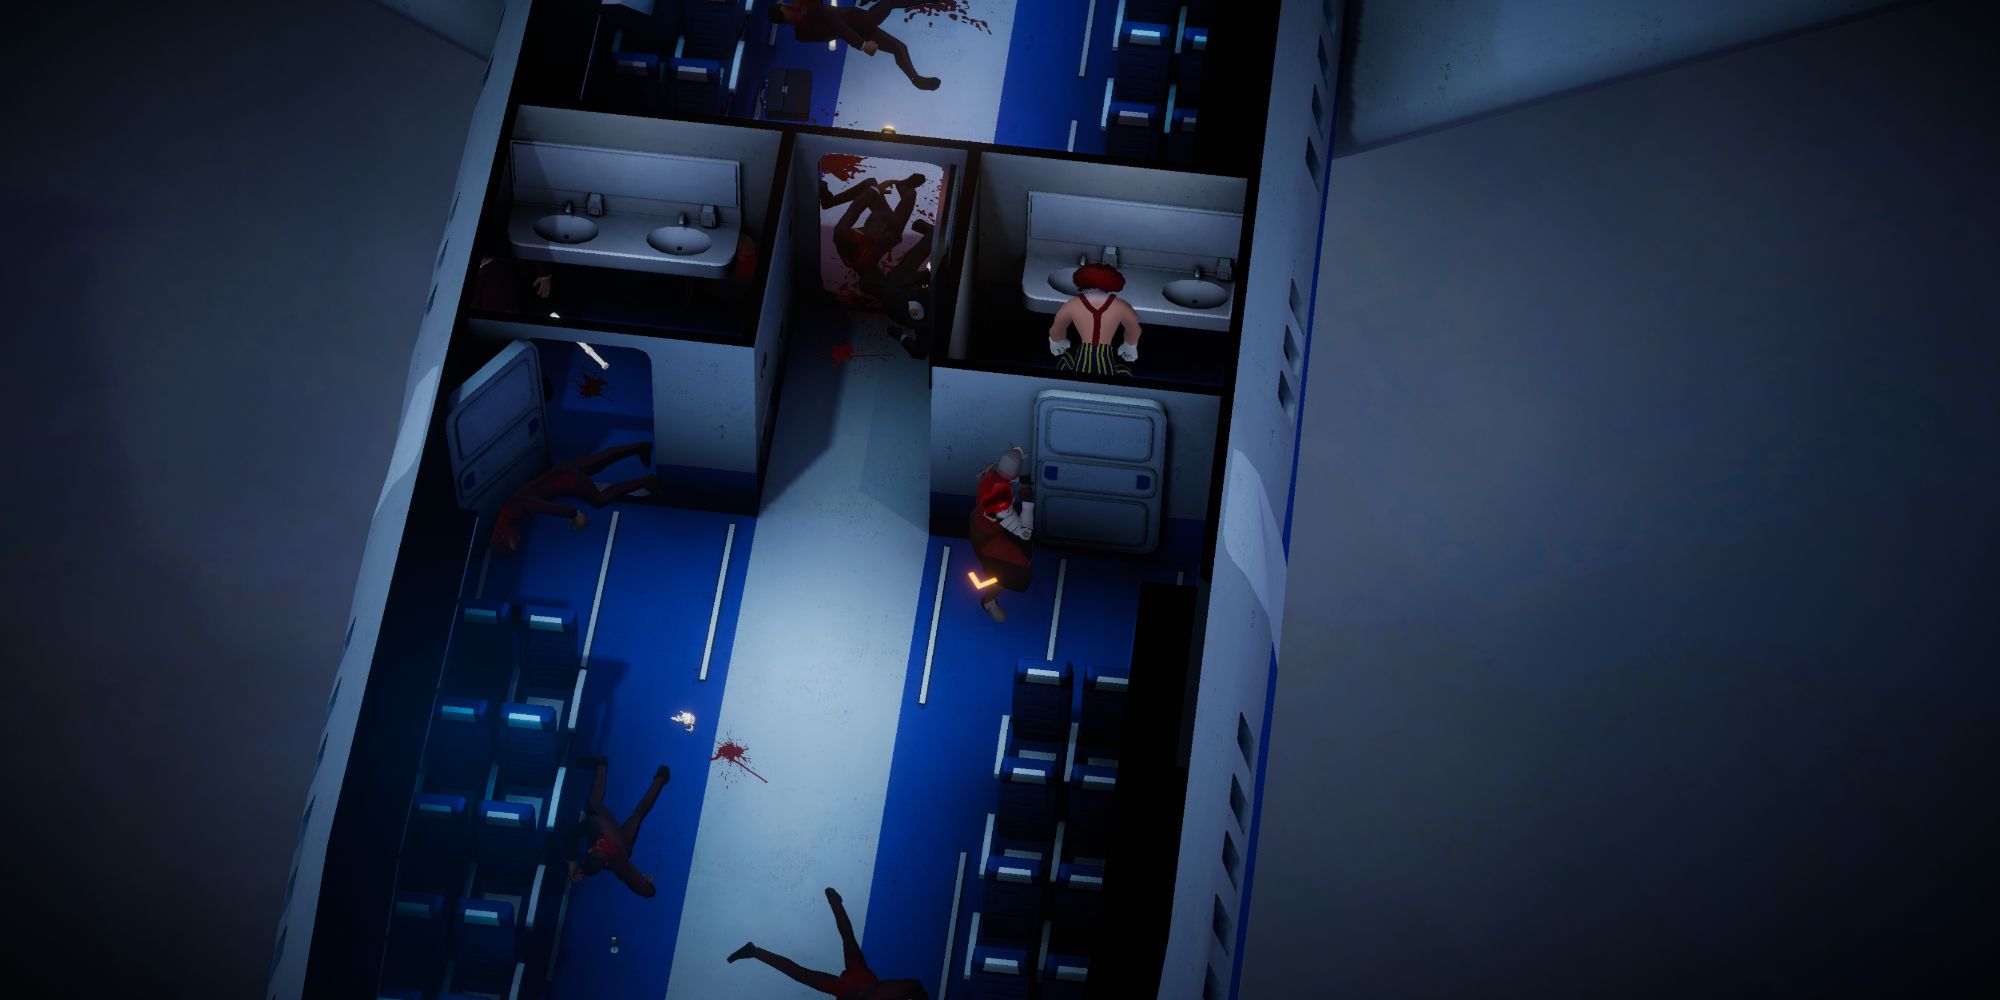
Once you're aboard the Airplane in Mission 25, you can find your 20th Special Character relatively early on in the mission. Your target is a clown having a real rough time in the bathroom of the plane, which is the third room you reach in the level. To easily find them, this area has two bathrooms, and it is the first time the plane's layout looks different. There are bathrooms on either side of the plane. One has an enemy in it, and the other… this clown. Eliminate the enemies before speaking to Ronald!
- Mission 25 – Airplane
Return to Special Character Quicklinks
Special Character #21

The Construction Site is the 26th mission of the game and contains the 21st Special Character within it. This Special Character can be a little tricky to find, making it one of the game's hardest. To easily find them, progress up to the point where you have to take a lift up to the section where a sniper is trying to assassinate you. However, do not enter the lift. Instead, head left until you see a red light and a man perched on the platform across from you. Speak to them to cross another off your list!
- Mission 26 – Construction Site
Return to Special Character Quicklinks
Special Character #22
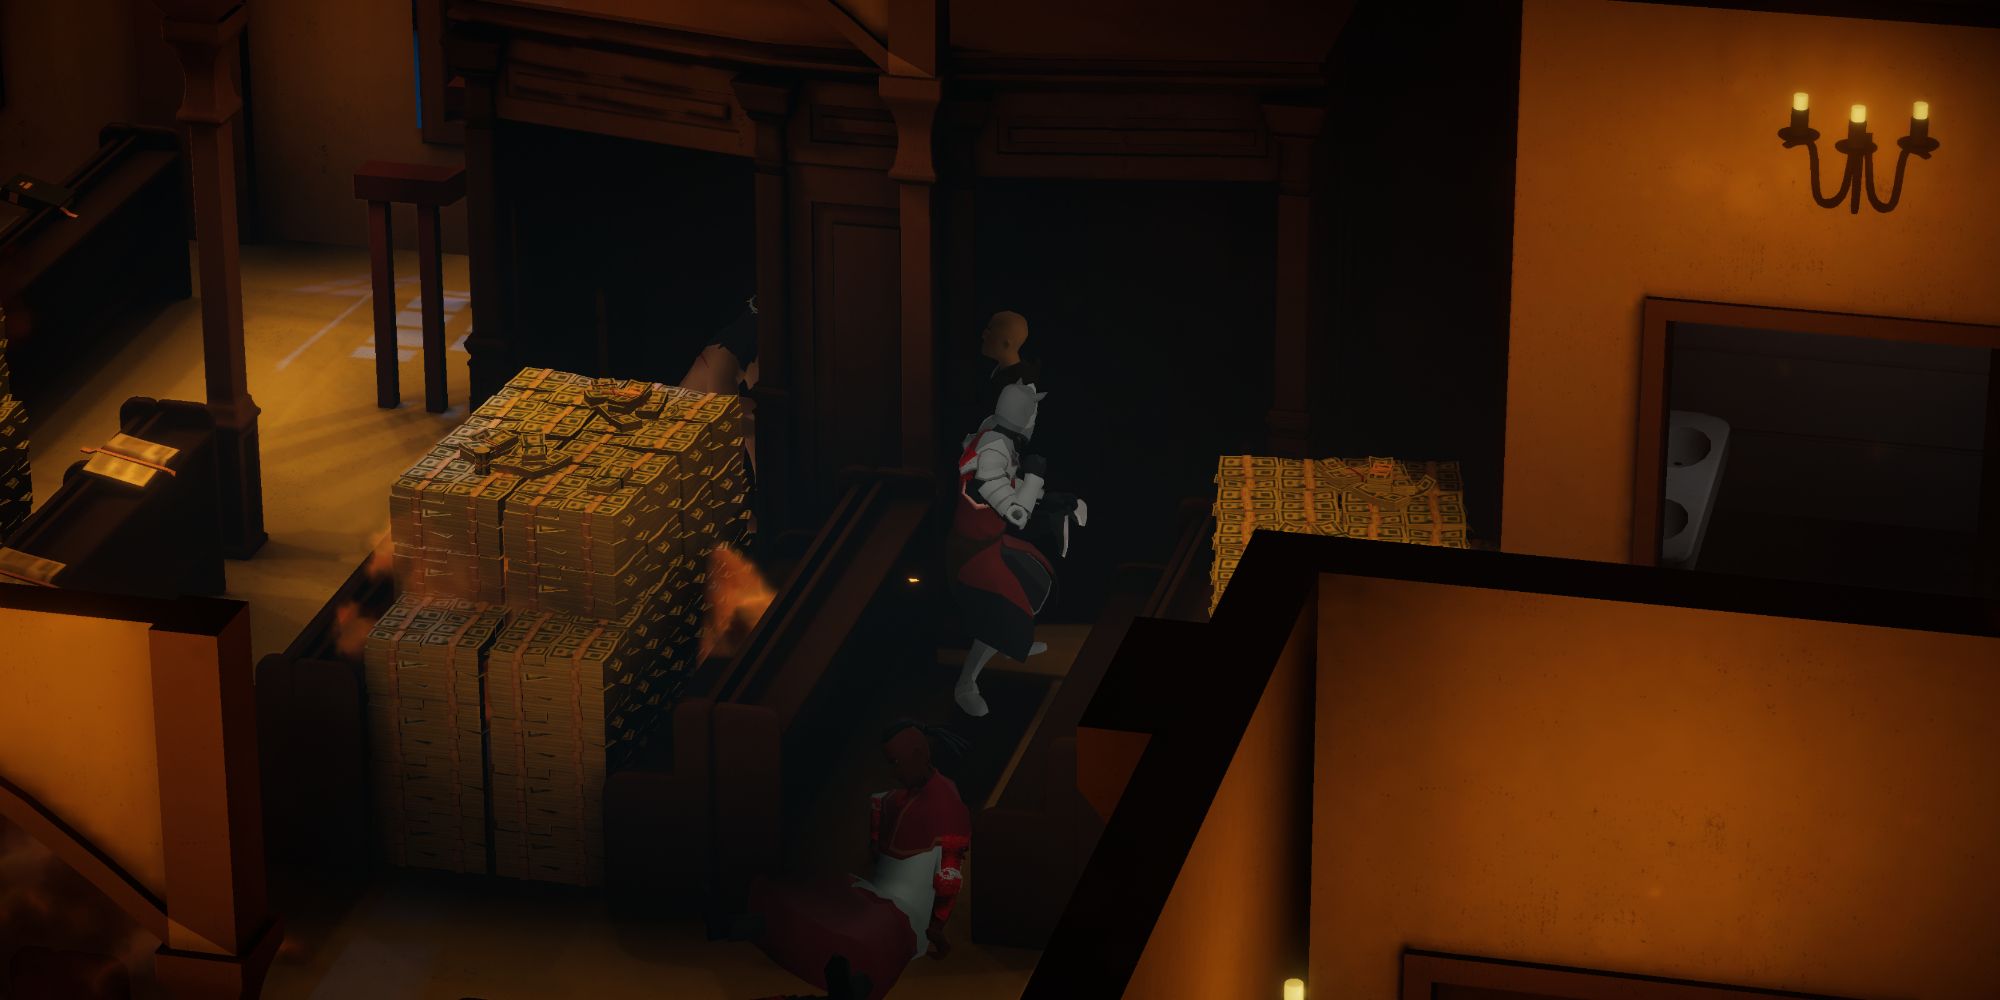
Special Character number 22 will be found within the Church in mission 27 and is at the very start of the level. However, there are a few catches. As soon as you enter the Church, your target will be on the right, just past the doorway, between two piles of cash. They are inside a confession booth speaking to the holy man himself. But, before you can talk to them, you must first eliminate many waves of enemies, which can take quite a bit of time.
- Mission 27 – Church
Return to Special Character Quicklinks
Special Character #23
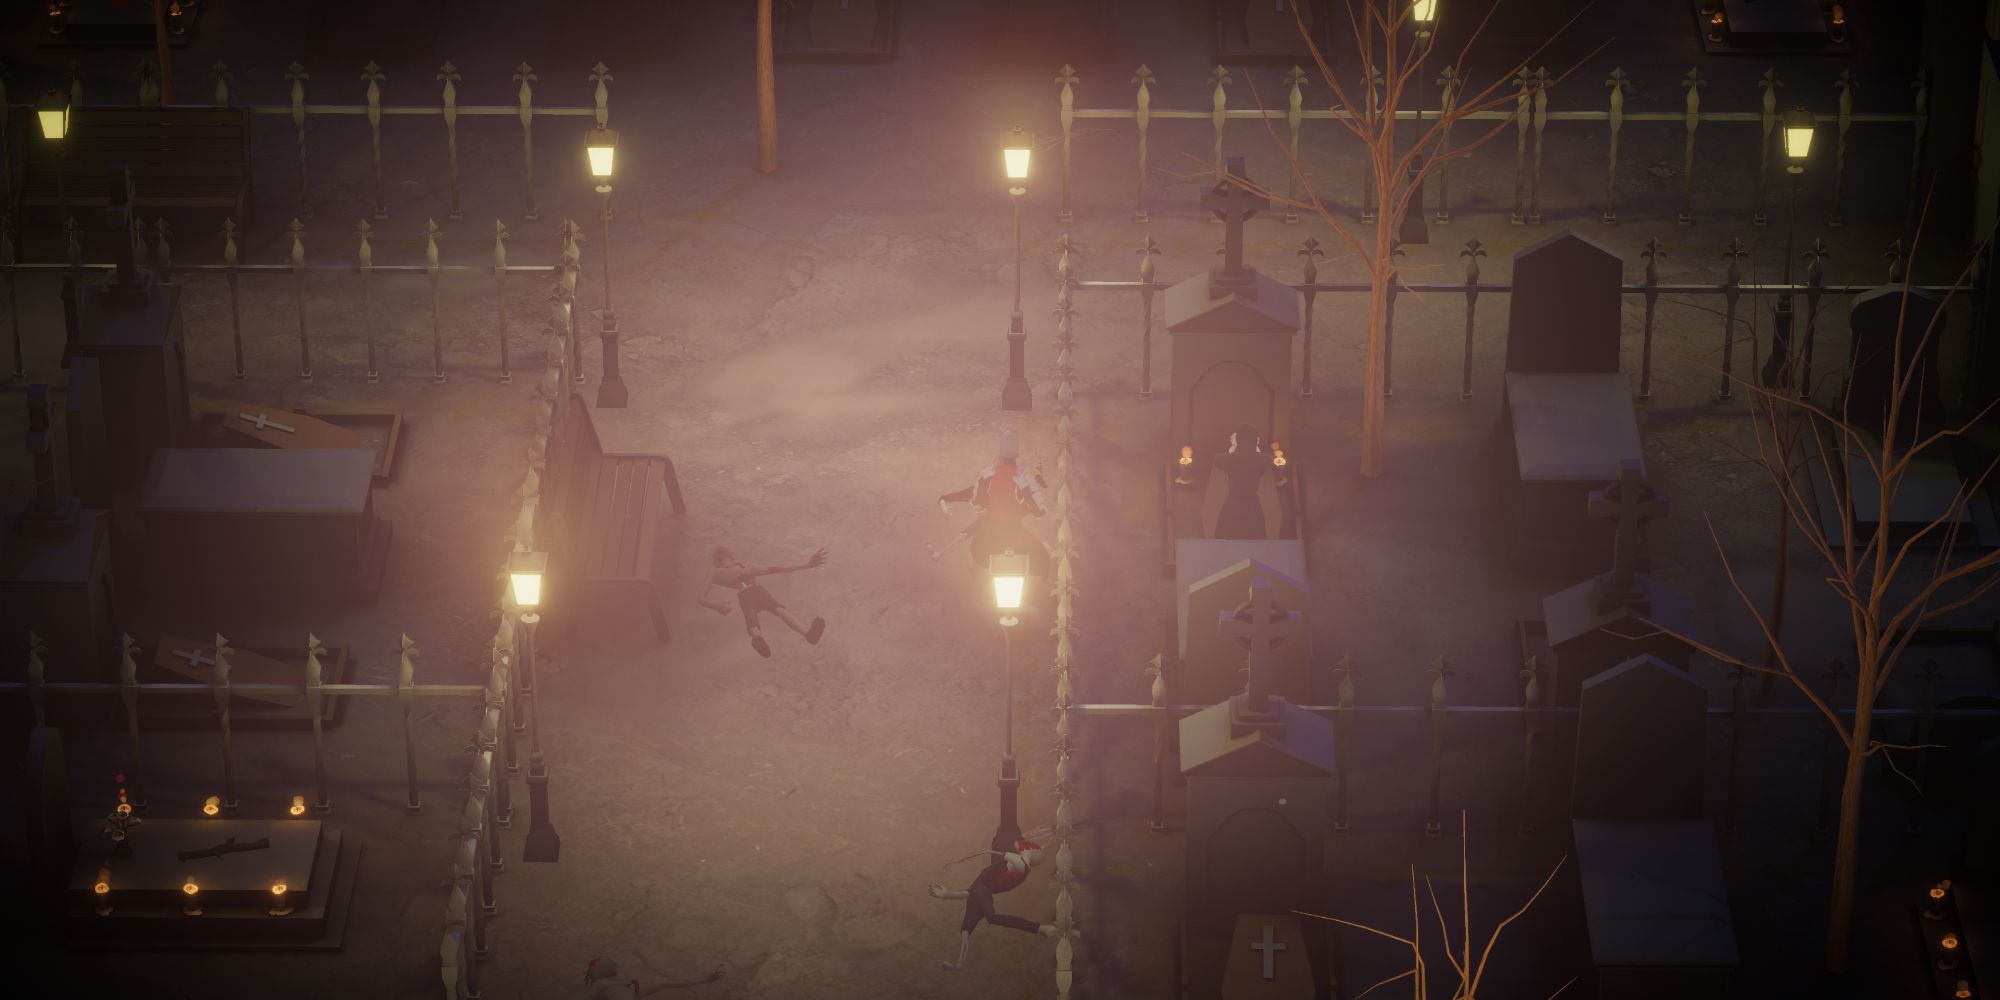
Your 23rd Special Character will be found in the Graveyard of Mission 28. Like most people in this guide, you cannot speak to this target until after you defeat the seemingly endless hordes of enemies. This can take quite a bit of effort as the enemy type introduced in this level can be brutal to deal with on higher difficulties.
After you do that, head into the Church in the middle of the map, then take the right exit. Once outside, take the left pathway that leads to the top of the screen. Keep your eyes peeled for a woman praying at a grave on your right, right before the path splits. Speak with her over the gate to get cross off yet another one!
- Mission 28 – Graveyard
Return to Special Character Quicklinks
Special Character #24
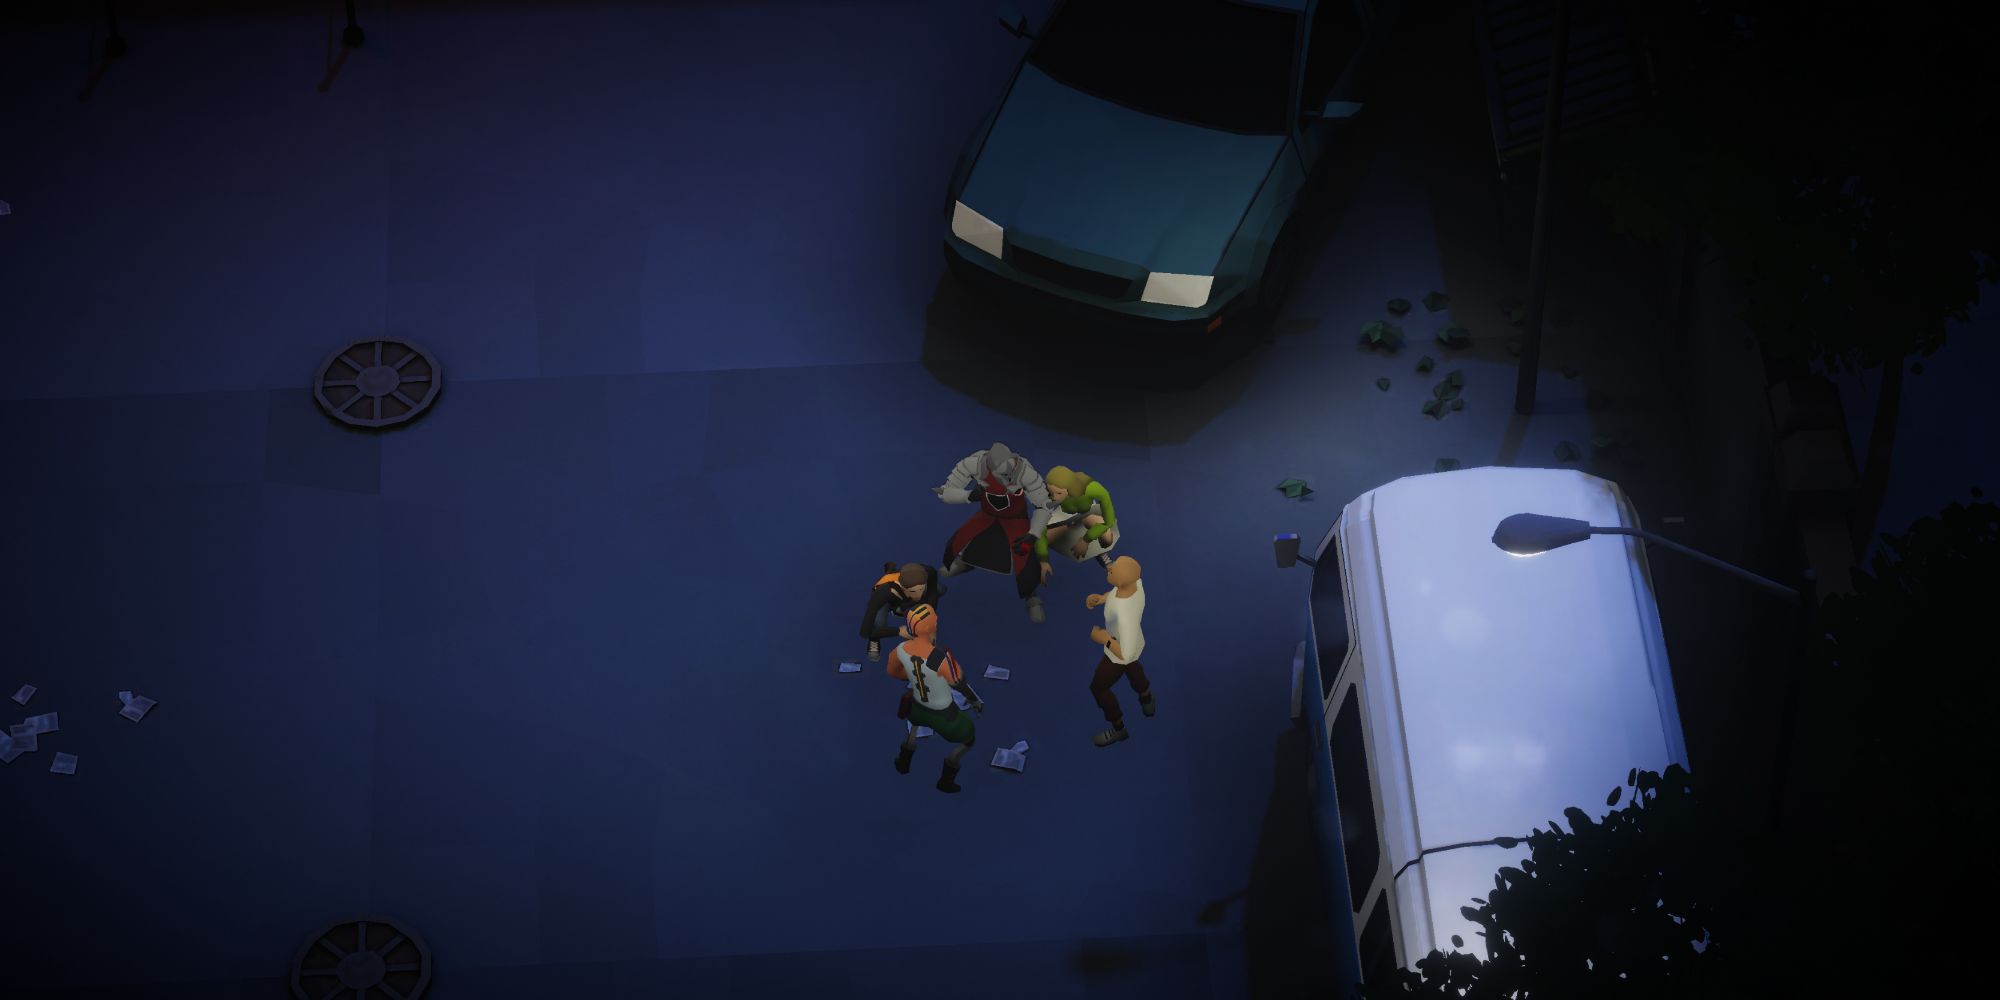
Mission 29, Suburbs, is rather long and chaotic, but your 24th Special Character is at least easy to find. The bad news is that you will have to make it to the very end of the level before you can speak with them. After fighting your way through countless amounts of enemies and taking on a boss encounter, you will hop over a wall that leads you to the stage exit. But, before taking it, roam around the parking lot to see a group of club ravers in the bottom right corner of the area. Speak with them to get down with another Special Character added to your collection!
- Mission 29 – Suburbs
Return to Special Character Quicklinks
Special Character #25
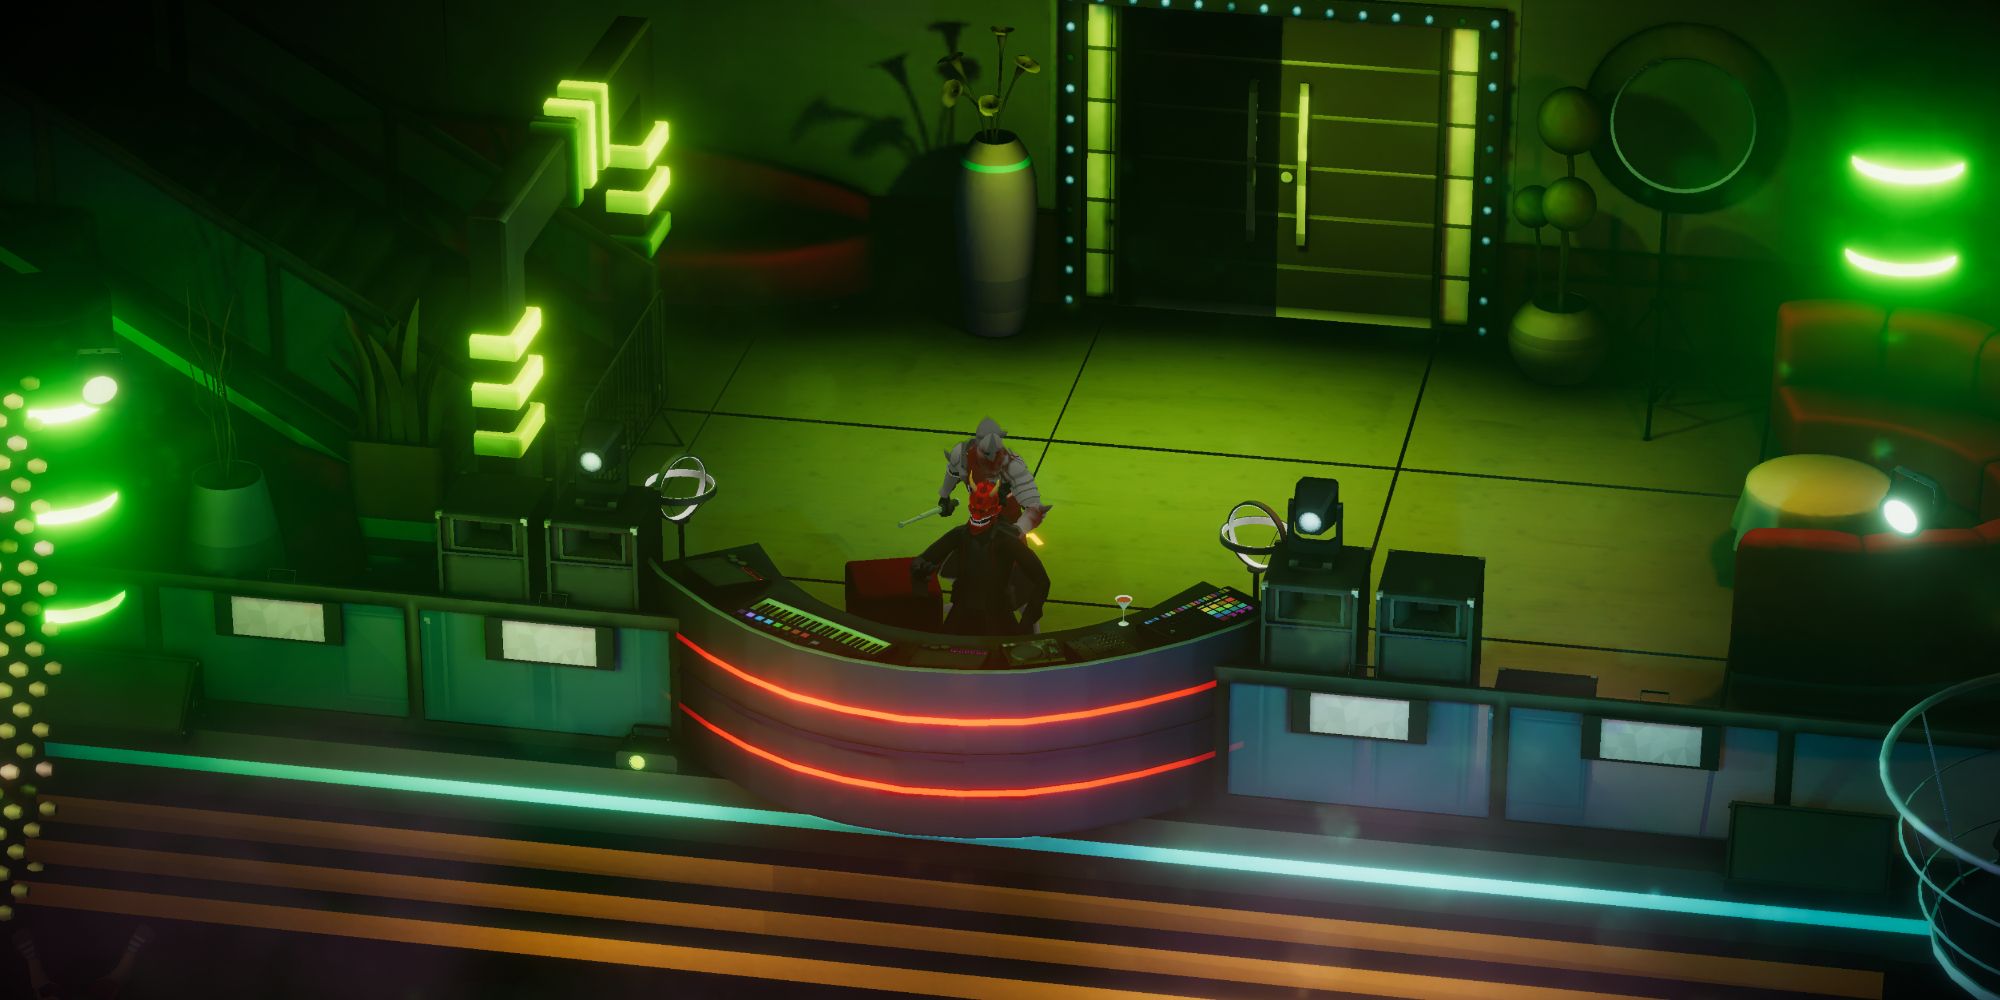
Reminiscent of the previous Special Character, the 25th one is found at the very end of the Night Club stage, which is this game's 30th mission. To find them, fight your way to the end of the level, where you have to climb up to where the DJ is, who is surrounded by bright green lights. Speak to the DJ once here to cross them off your list!
- Mission 30 – Night Club
Return to Special Character Quicklinks
Special Character #26
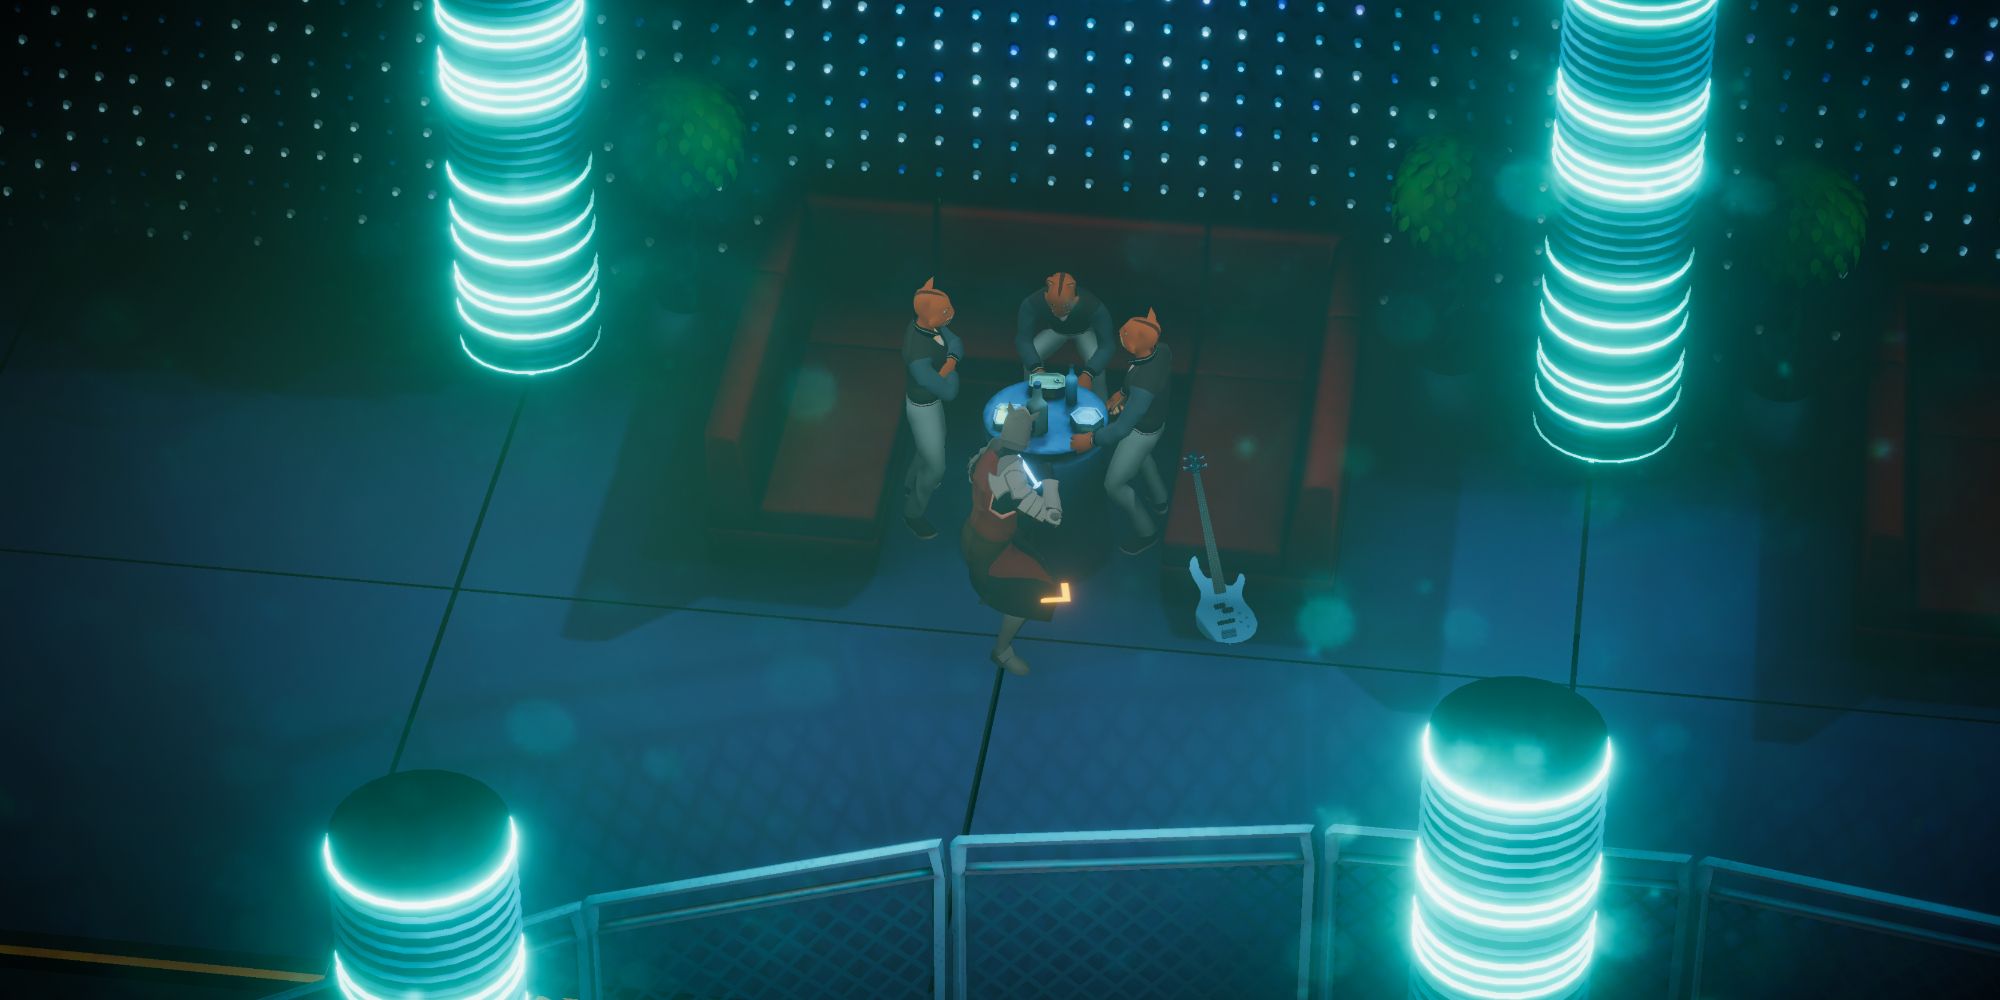
The 26th Special Character is one of our favorites and is found in the VIP Room, which is the game's 31st mission. To get to these catmen eating canned tuna in the club, you must make your way to this stage's boss encounter. When there, defeat the boss, then instead of following the marker to the next area, take a left and circle around the arena until you meet these wonderfully odd people!
- Mission 31 – VIP Room
Return to Special Character Quicklinks
Special Character #27
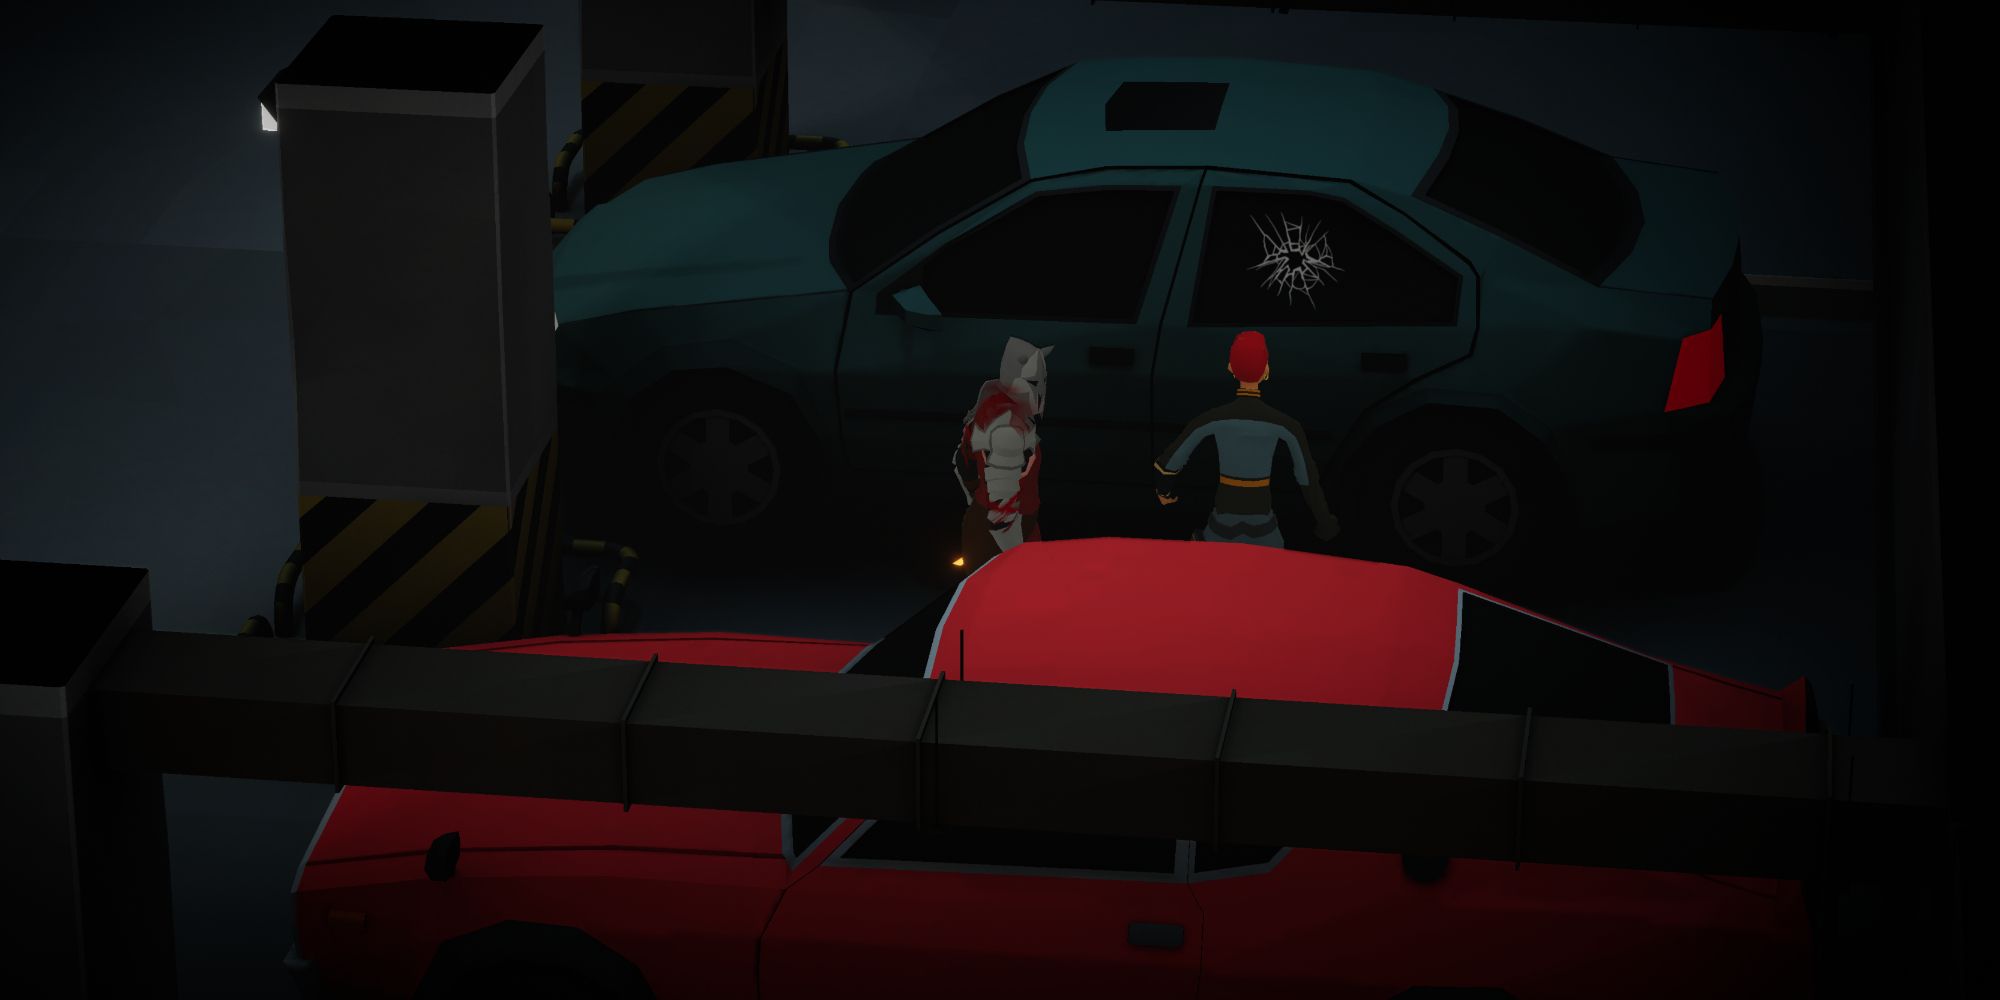
The Parking Garage is the 33rd mission of the game and contains the 27th Special Character of the game, who is located at the very start of the level. However, you know the stipulations by now, you will have to eliminate all enemies in the area before speaking to them. But, once you take care of them, head over to the right side of the Parking Garage and look for a bright red car. Your target will be beside the red car, examining his blueish car, which has a bullet hole in its back window. Oops.
- Mission 33 – Parking Garage
Return to Special Character Quicklinks
Special Character #28
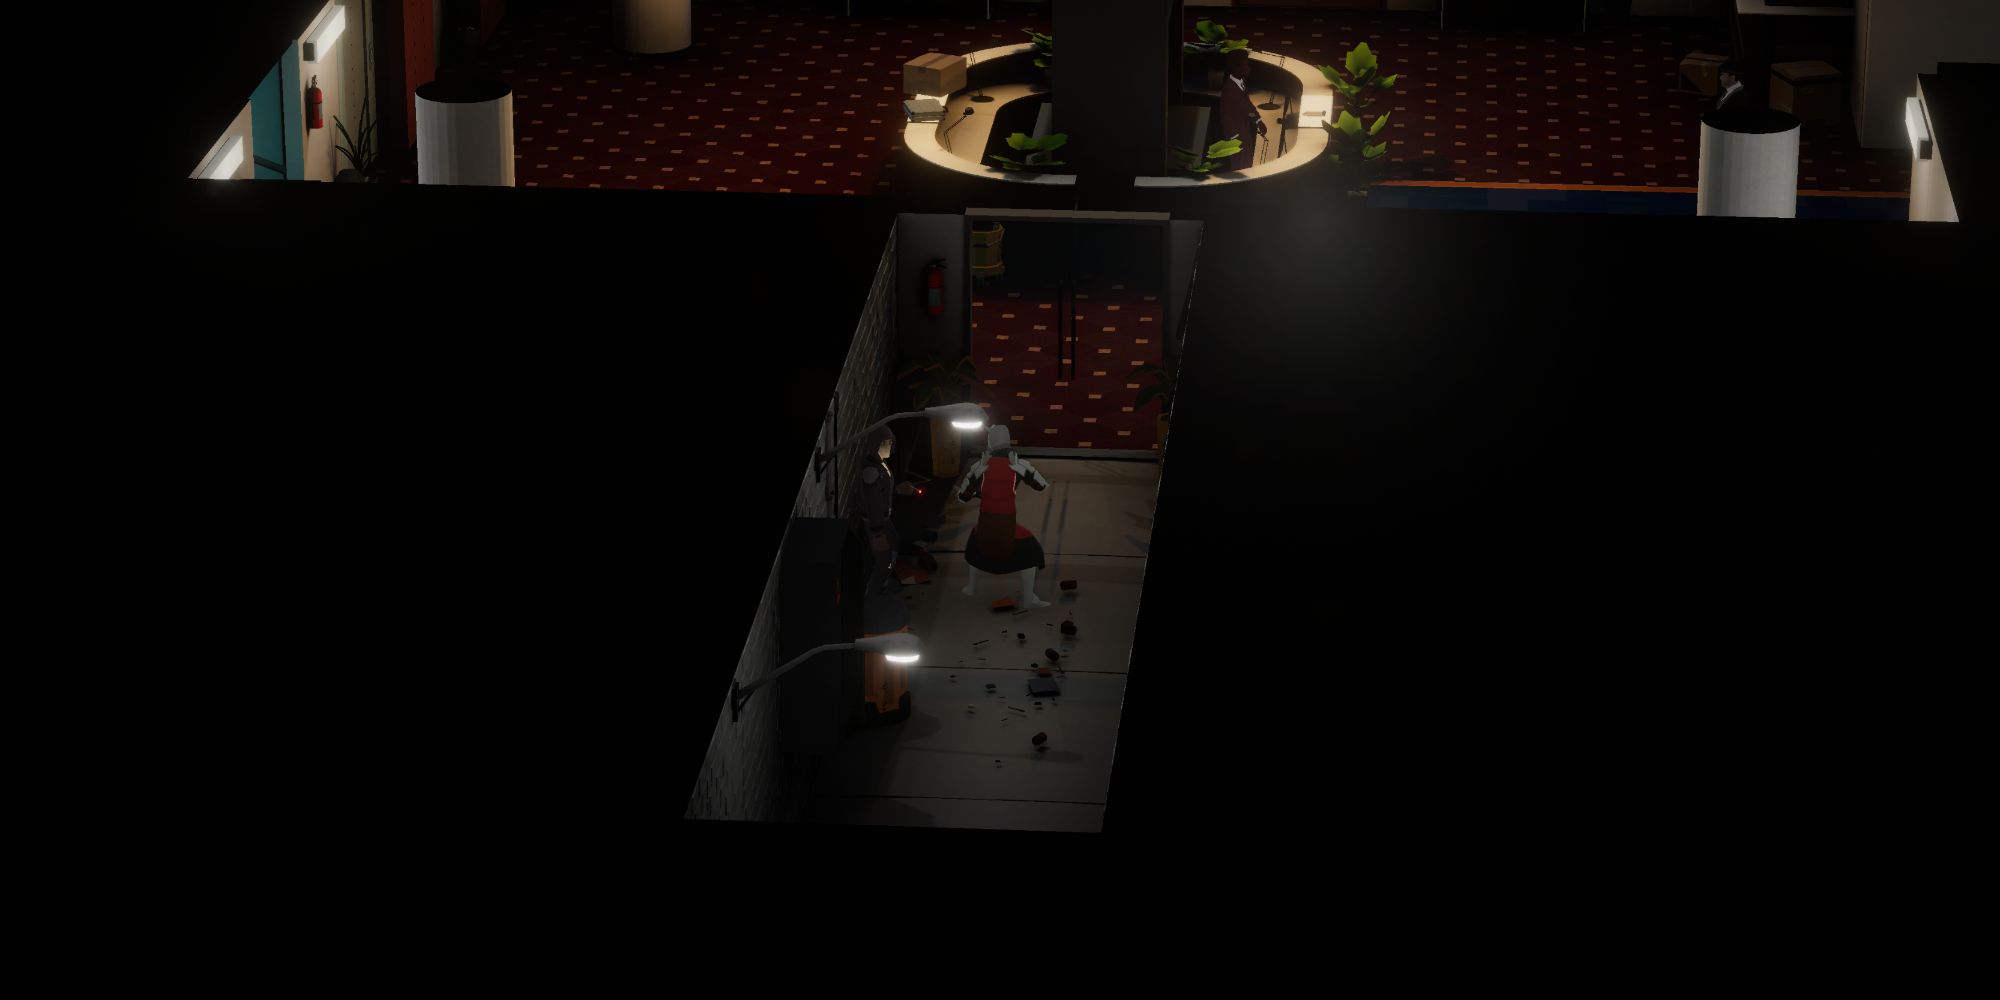
The old method keeps coming back, with Mission 34, Lobby, being the most in-your-face of them all. To find the 28th Special Character, simply load into the mission, take a few steps forward, and speak with the man leaning against the wall smoking a cigarette. That's it.
- Mission 34 – Lobby
Return to Special Character Quicklinks
Special Character #29
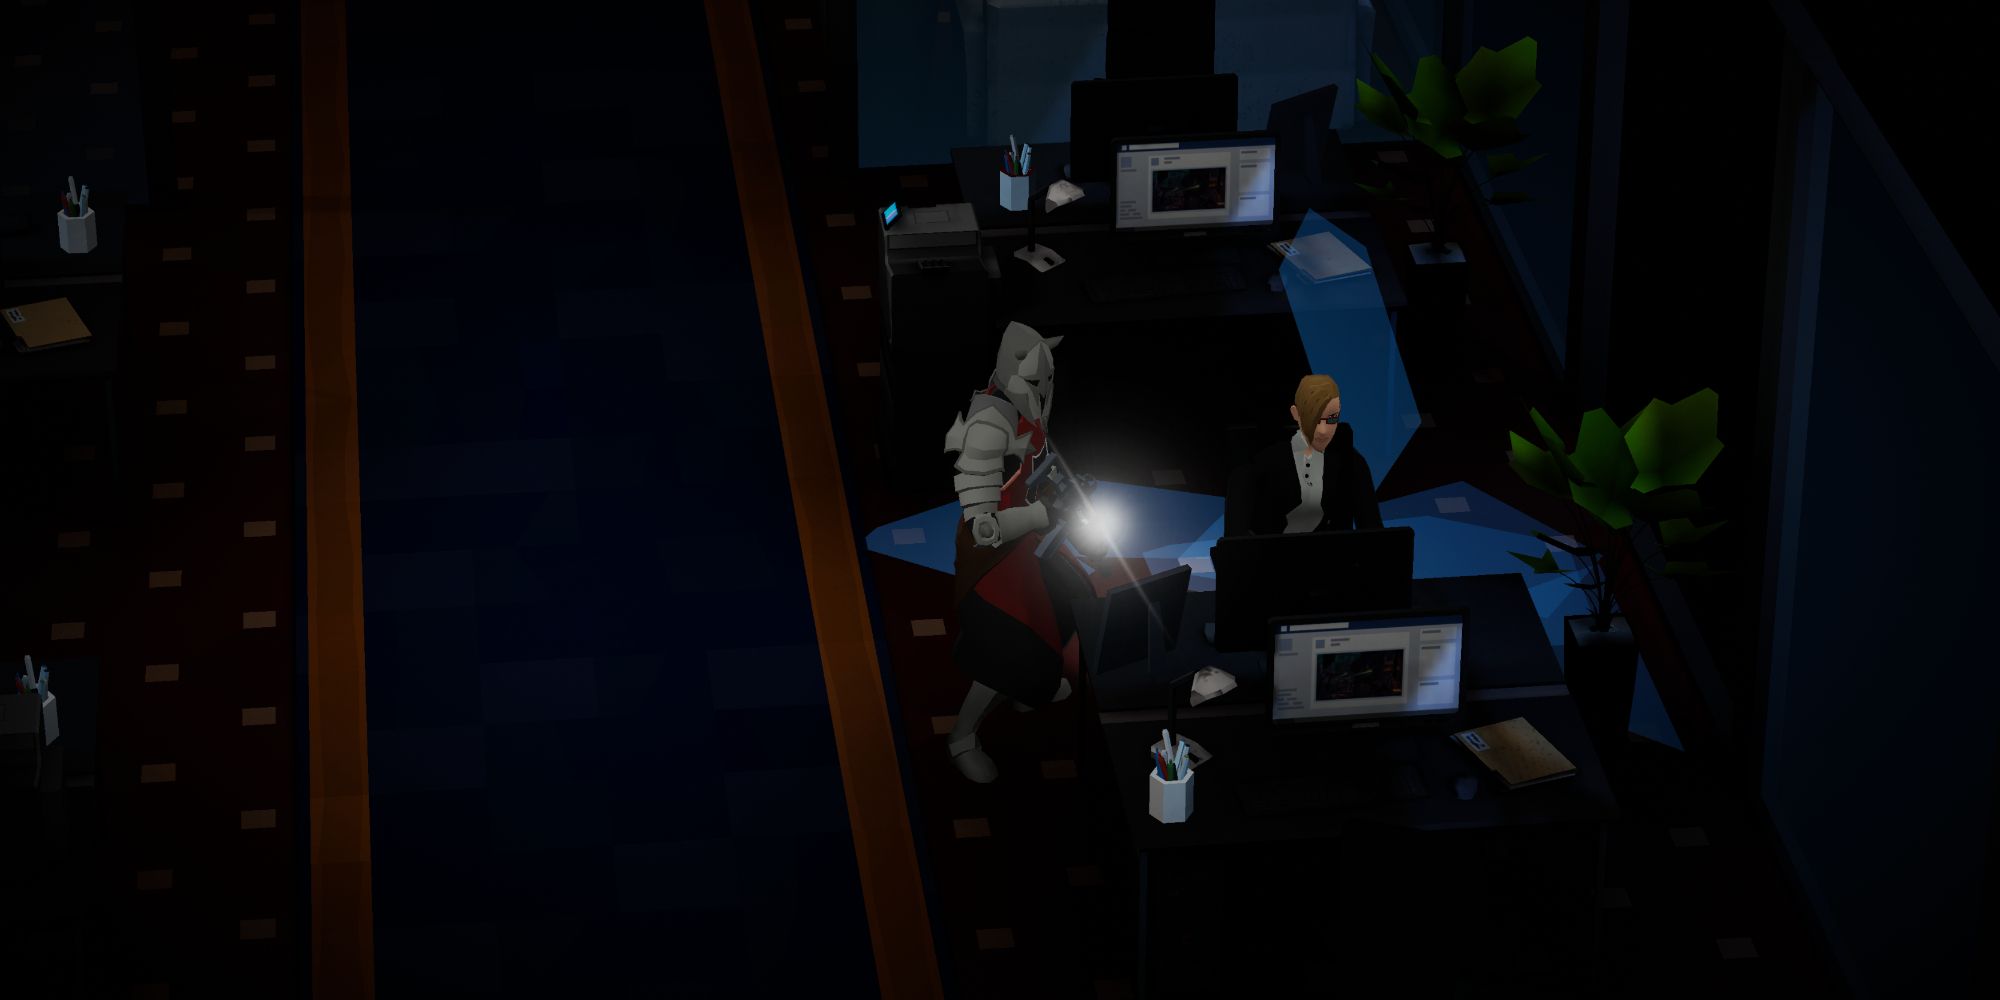
Special Character 29 is found early in the 36th mission of the game, Eightieth Floor, and requires you to eliminate several waves of enemies before you can speak with her. Once you have taken care of the waves, before moving on to the next area, explore the office and head towards the bottom right of the room, your target will be sitting at her desk, typing away like nothing just happened.
- Mission 36 – Eightieth Floor
Return to Special Character Quicklinks
Special Character #30
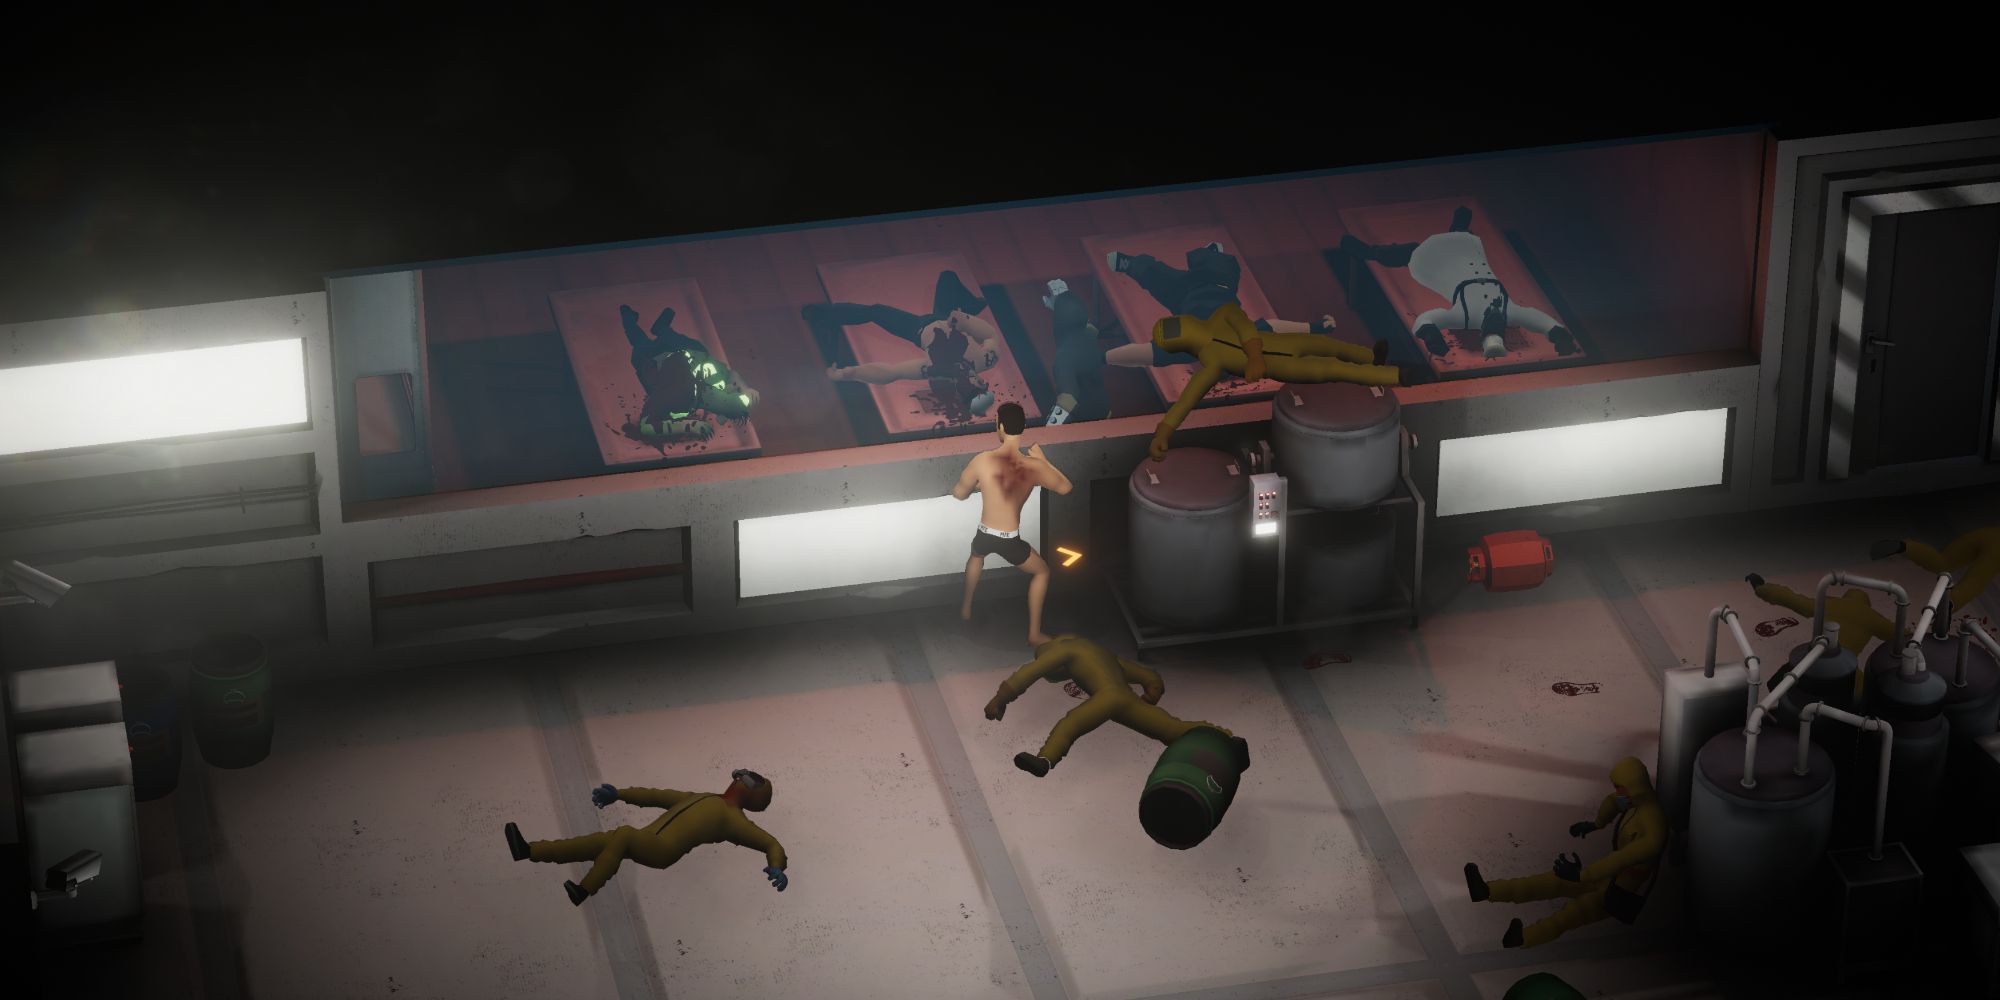
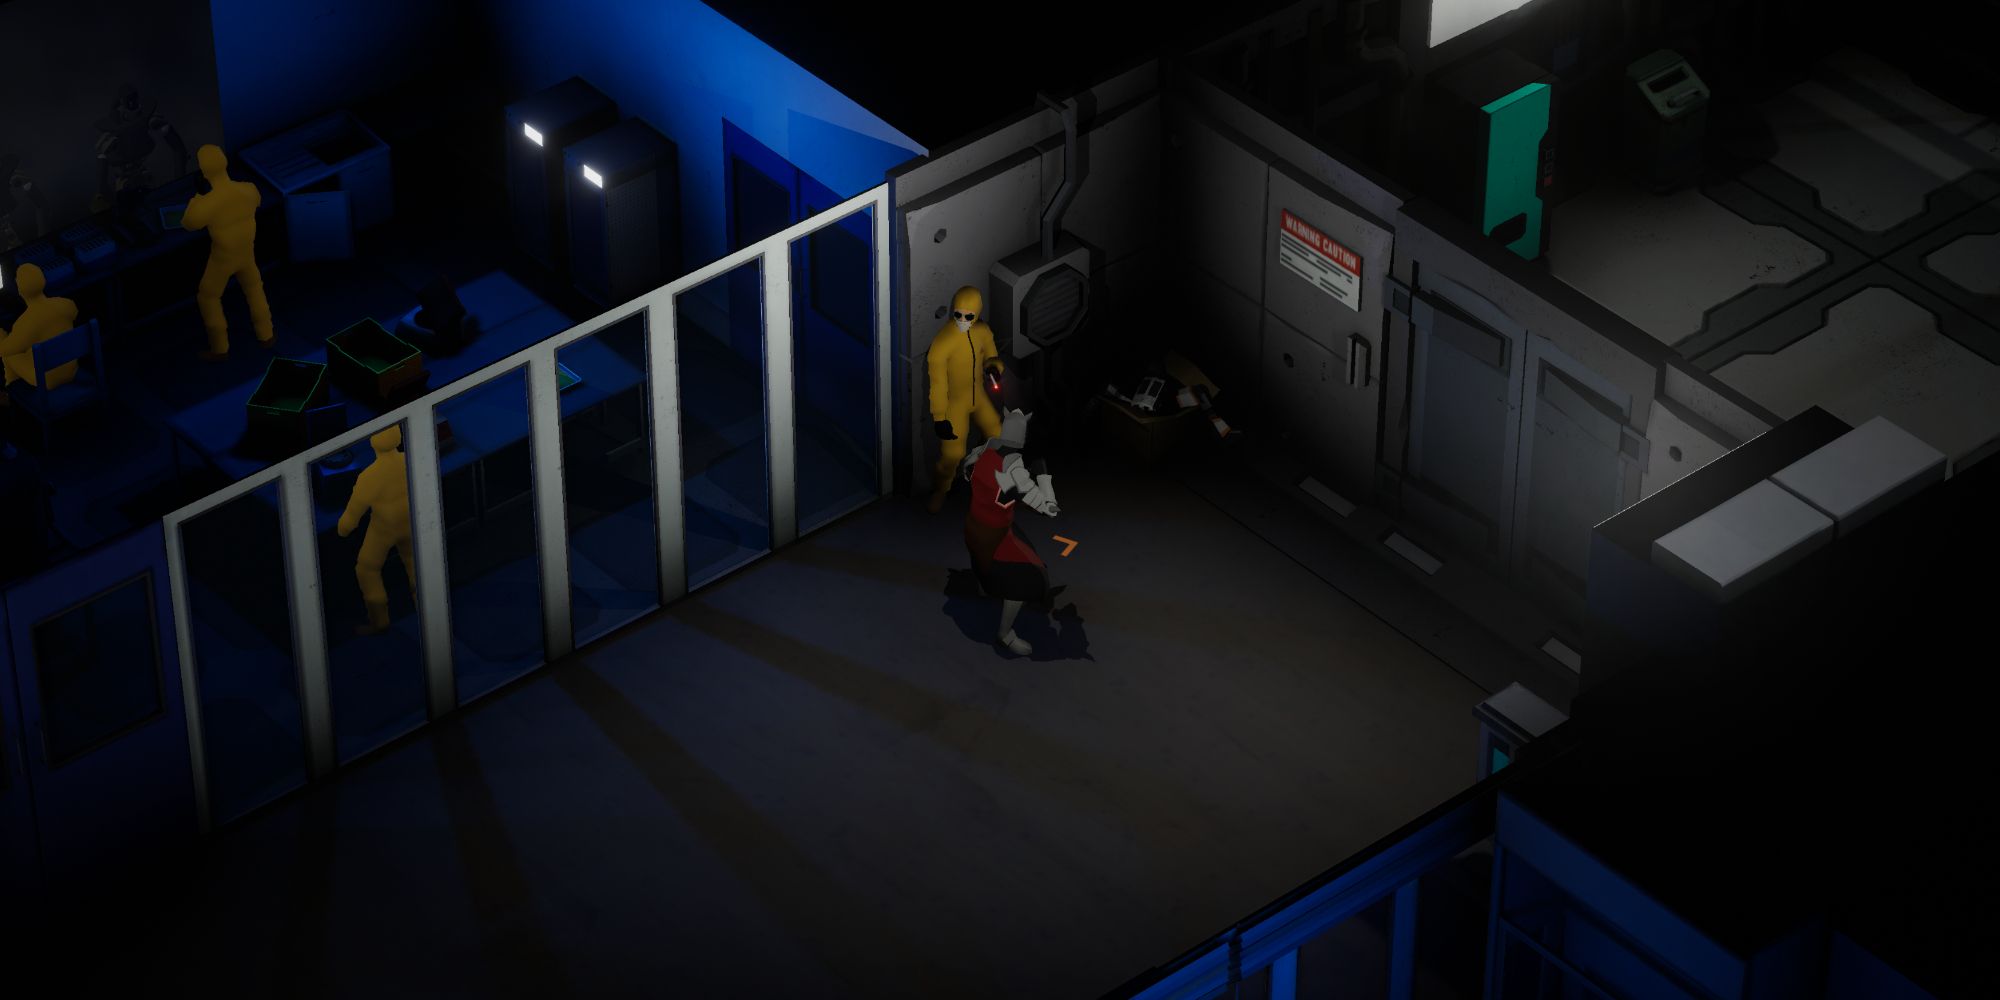
Breakout is the 37th mission of the game and has you roaming the facility in your underwear and is where you will also find your 30th Special Character. To quickly find them, make your way up to the point where you are locked into a lab where a few waves of crazed scientists try to kill you with toxic waste. After you dispatch them, stay in the room, and look for a large window. Your target will be looking away from you, but you can still interact with them!
- Mission 37 – Breakout
Return to Special Character Quicklinks
Special Character #31
Special Character 31 is almost exactly like what you did in mission 28 but requires one or two more extra steps. And we mean that quite literally. To get this character, load up mission 38, Laboratory, walk several steps forward, and speak with the person in the hazmat suit to the left leaning against the wall for a smoke. Simple as that!
- Mission 38 – Laboratory
Return to Special Character Quicklinks
Special Character #32
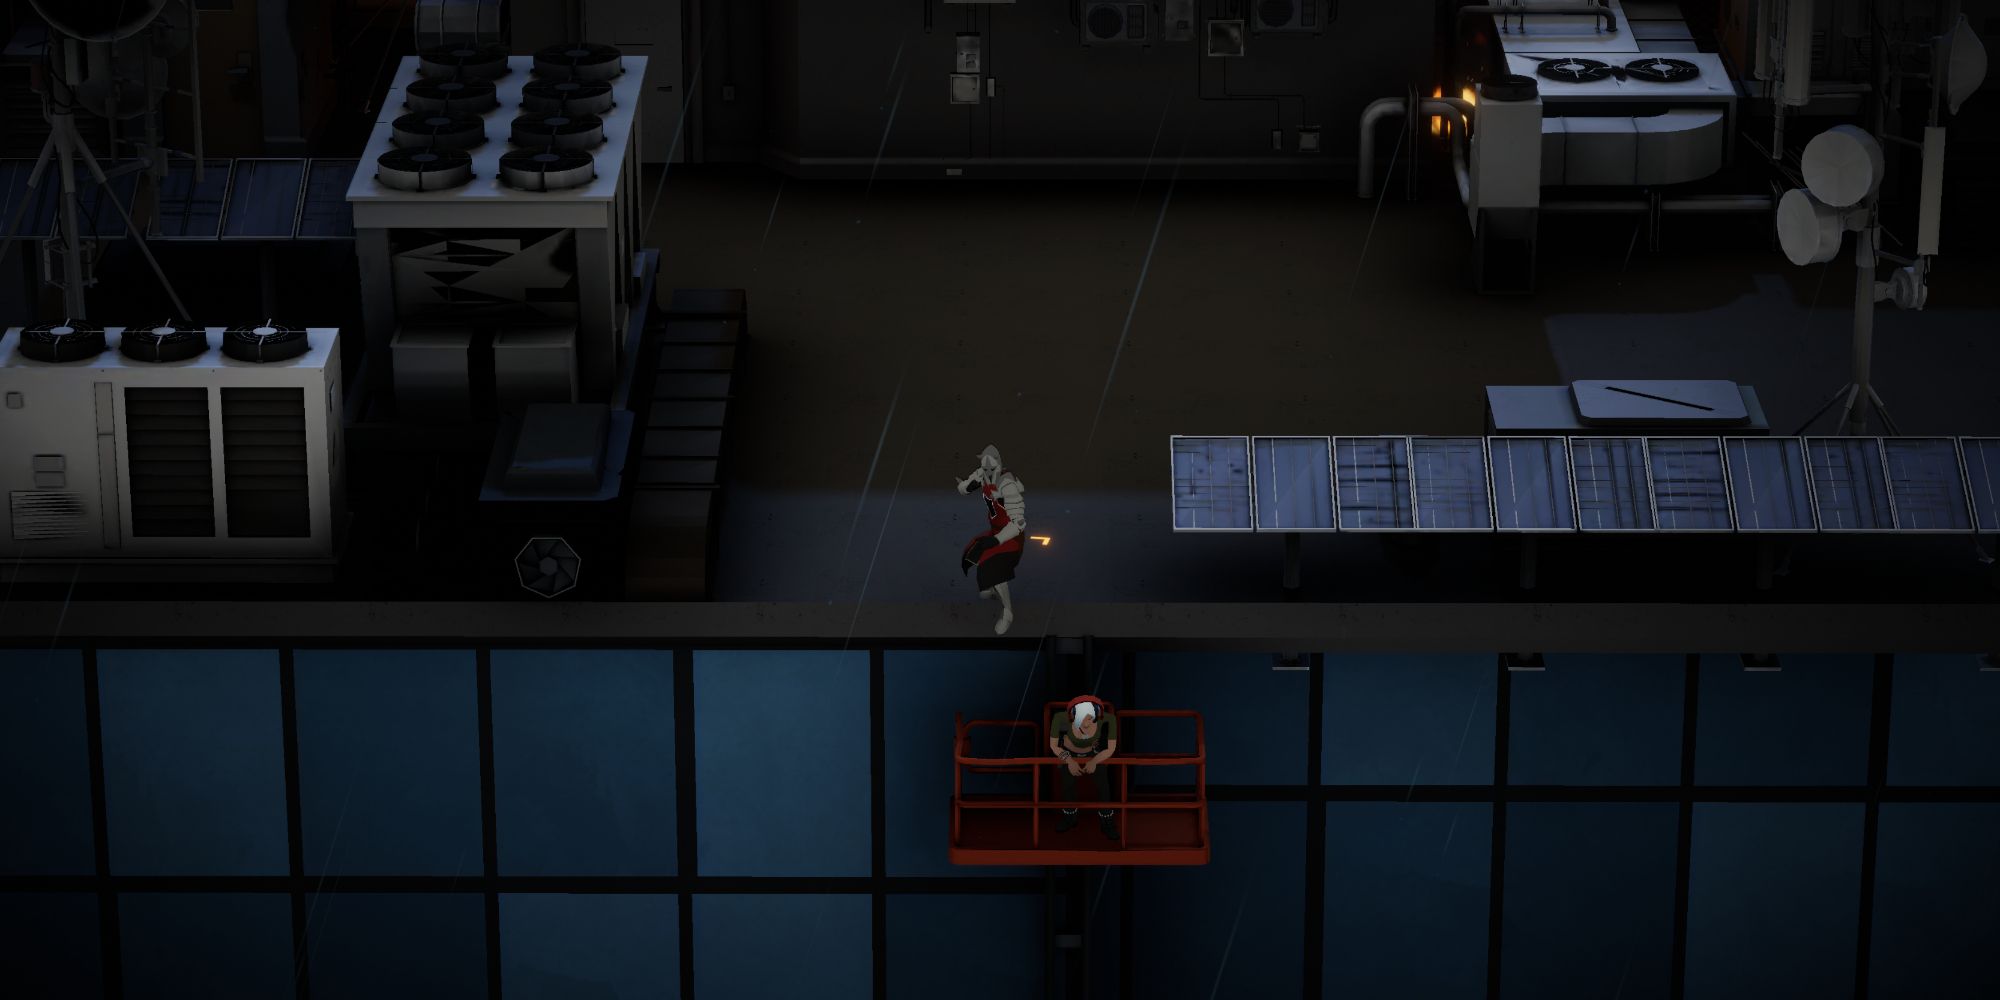
Special Character 32 is the last person you need to speak to and is fittingly found in the final mission of the game, Rooftop. And it wouldn't feel right if it wasn't an easy one, right? Your target can be found at the very start of the stage, on the side of the highrise. To get to her quickly, start the mission and walk forward until you see an opening to the right. Take the opening to see her on the side of the building, looking over her suspended scaffolding.
- Mission 40 – Rooftop
Return to Special Character Quicklinks
Source: Read Full Article